How to Deploy your Nodejs Application
In this article, we will show you how to deploy your Node.js application to our cloud platform. In our nodejsclusters hosting, we installed Nginx and Supervisor. You can use Supervisor to manage your Node.js application and use nginx as the proxy server. Our nodejsclusters hosting supports multiple Node.js applications, multiple sites, and multiple domains.
1. Know the Demo Project
Once you have deployed a nodejsclusters instance, you will get an URL to access the Node.js demo project. For example, https://nodejsclusters-1356**-0.cloudclusters.net/
While you access it, it should be like screenshot below:

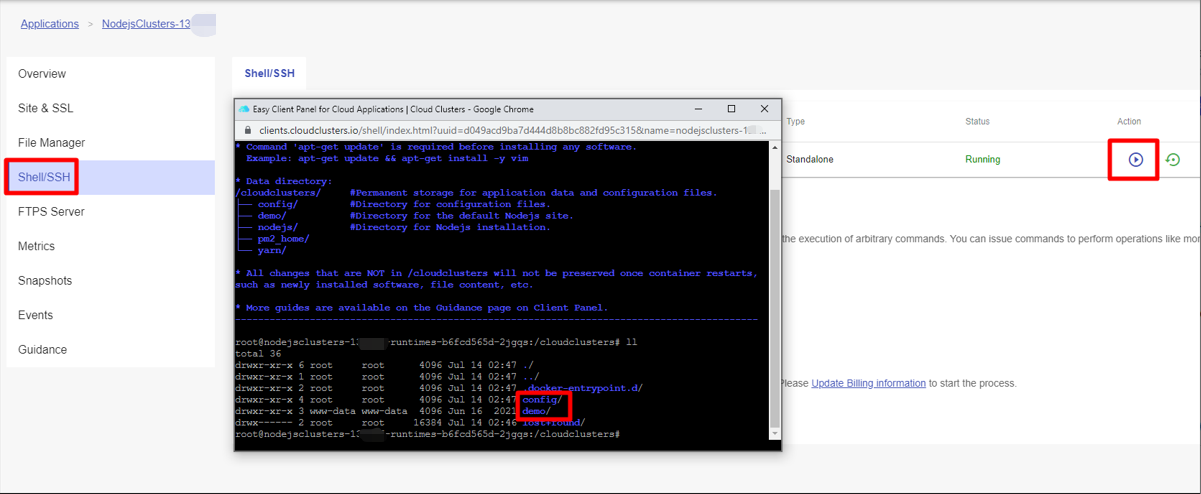
In the client panel. Login into Shell/SSH. You will be in the working directory.
/cloudclusters is the working directory.
/cloudclusters/demo is the directory for the demo project.
/cloudclusters/config is the directory for storing configuration files(Nginx and Supervisor).
There is a demo.conf file under /cloudclusters/config/supervisor. This is the configuration file for the supervisor to manage the Node.js application. command=node /cloudclusters/demo/index.js Defined the command to start Node.js application directory = /cloudclusters/demo/ Defined where to execute the command.

There is a default.conf file under /cloudclusters/config/nginx. This is the configuration file for nginx to serve the Node.js demo application.
Nginx is listening on 80. The Node.js demo application is listening on 8080. This configuration file indicates that all requests from https://nodejsclusters-1356**-0.cloudclusters.net/ will be forwarded to http://127.0.0.1:8080$request_uri;.

2. Deploy your Node.js application with your domain name
2.1 Add your domain name to Node.js application
Please follow up https://www.cloudclusters.io/docs/runtime/Adding%20Your%20Domain1608099880.html to Add your domain name to Node.js application first.
2.2 Upload or git clone your Node.js application to server
If you upload your application to servers, please follow the guide on how to transfer data using FTPS.
If you would like to git clone your application to servers, use the following command to git clone your project to the /cloudclusters/ directory. Be sure to replace the git source.
# cd /cloudclusters/
# git clone https://github.com/acemilyalcin/sample-node-project.git

2.3 Install dependency packages into your Node.js project
In case you need to install dependency packages for your Node.js project, you can use the following commands.
# cd sample-node-project/
# npm install

2.4 Start your Node.js application for test
Now, you can use “npm start” or “node app.js” to start your Node.js project. And you can see the new Node.js application is listening to the 3005 port. You can press “ctrl c” to stop the Node.js project.

3. Manage your Node.js application by Supervisor
3.1 Copy demo.conf to sample.conf
Make a copy of supervisor configuration file for the new project.
# cd /cloudclusters/config/supervisor/
# cp demo.conf sample.conf

3.2 Modify sample.conf
Change the content as below:
[program:sample]
command=node /cloudclusters/sample-node-project/app.js
autostart=true
startsecs=10
autorestart=true
startretries=3
redirect_stderr=true
stdout_logfile = /var/log/supervisor/nodejs.log
directory = /cloudclusters/sample-node-project
logfile_maxbytes=50MB
logfile_backups=5

3.3 Restart supervisor to load the configuration file
$ supervisorctl update
$ supervisorctl status
3.4 Verify if your project is running or not
After all processes are running. You can use command below to verify that if your project is running or not.
$ netstat –natpl

4. Create Nginx virtual host server to serve your Nodejs application
4.1 Add a new configuration file to Nginx
Make a copy of default.conf to sample.conf under /cloudclusters/config/nginx. Execute command below:
$ cd /cloudclusters/config/nginx
$ cp default.conf sample.conf

4.2 Access your Node.js application using your domain
If you are using your top domain, You have to change the content as below for sample.conf:
server {
    listen 80;
    server_name www.yourdomainname.com;
    server_name yourdomainname.com;

    location / {
        proxy_pass http://127.0.0.1:3005$request_uri;
    }
}
If you are using a subdomain, please use the content like below:
server {
    listen 80;
    server_name sub.yourdomainname.com;

    location / {
        proxy_pass http://127.0.0.1:3005$request_uri;
    }
}

Use the following command to restart nginx:
$ supervisorctl restart nginx
Then you can access your nodejs application via your domain name.
4.3 Access your Node.js application using default domain
If you do not have a domain at this moment, you can use subdomain we provided to access your Node.js application.
Please use the content like below in /cloudclusters/config/nginx/sample.conf:
server {
    listen 80;
    server_name https://nodejsclusters-12***-0.cloudclusters.net/;

    location / {
        proxy_pass http://127.0.0.1:3005$request_uri;
    }
}
Then remove the nginx configuration file default.conf for the default demo project.
$ rm /cloudclusters/config/nginx/default.conf
Use the following command to restart nginx:
$ supervisorctl restart nginx
Then you can access your nodejs application via your domain name.