Control Panel Guidance | Cloud Clusters
Account Registration
This Account Registration section gives you a simple overview of how to register a CCS Control Panel account, common prompts you may see, and important notes to know. With this information, you can complete registration smoothly and start using all features right away.
Registering a CCS Control Panel account is simple and straightforward. All you need to get started is a valid email address, and the entire sign-up process can be completed within minutes. Just visit the registration page, enter your email, follow the on-screen instructions, and you’ll be able to access your control panel quickly and easily.
Registration link: https://accounts.cloudclusters.io/signup
Note:If you encounter the following message during registration: “Regrettably, per our TOS, registration is currently unavailable for you.” It means our system has detected activity that does not meet our Terms of Service. In such cases, we are temporarily unable to provide further services.
Account Login
The Account Login section outlines the most common issues you may encounter when logging into your CCS Control Panel account, helping you quickly identify and resolve login-related problems.
During the login process, you may encounter the following issues:
| Error Message | Solution |
|---|---|
| Your account has been suspended. You are temporarily unable to log in. Please contact us if you have any concerns. | This occurs due to account misuse or not complying with our Terms of Service. Please check your previous emails for details or contact the Billing Team for assistance. |
| Please enter a correct email address and password. Note that both fields may be case-sensitive. | Entered username or password is incorrect. If forgotten, use the “Forgot Password” feature on the login page to reset credentials. |
| Illegal login | This occurs due to a temporary login restriction. Please try again using a different browser or network, or contact Support for assistance. |
| Invalid CAPTCHA | CAPTCHA entered incorrectly. If unreadable, click the image to refresh for a new one. |
| The verification code is incorrect. Please retry or get a new one. | If your account hasn’t been accessed for a long time or unusual login activity is detected, 2FA verification will be triggered. Please check your email and enter the verification code (valid for 20 minutes). If you don’t receive it, please contact Support. |
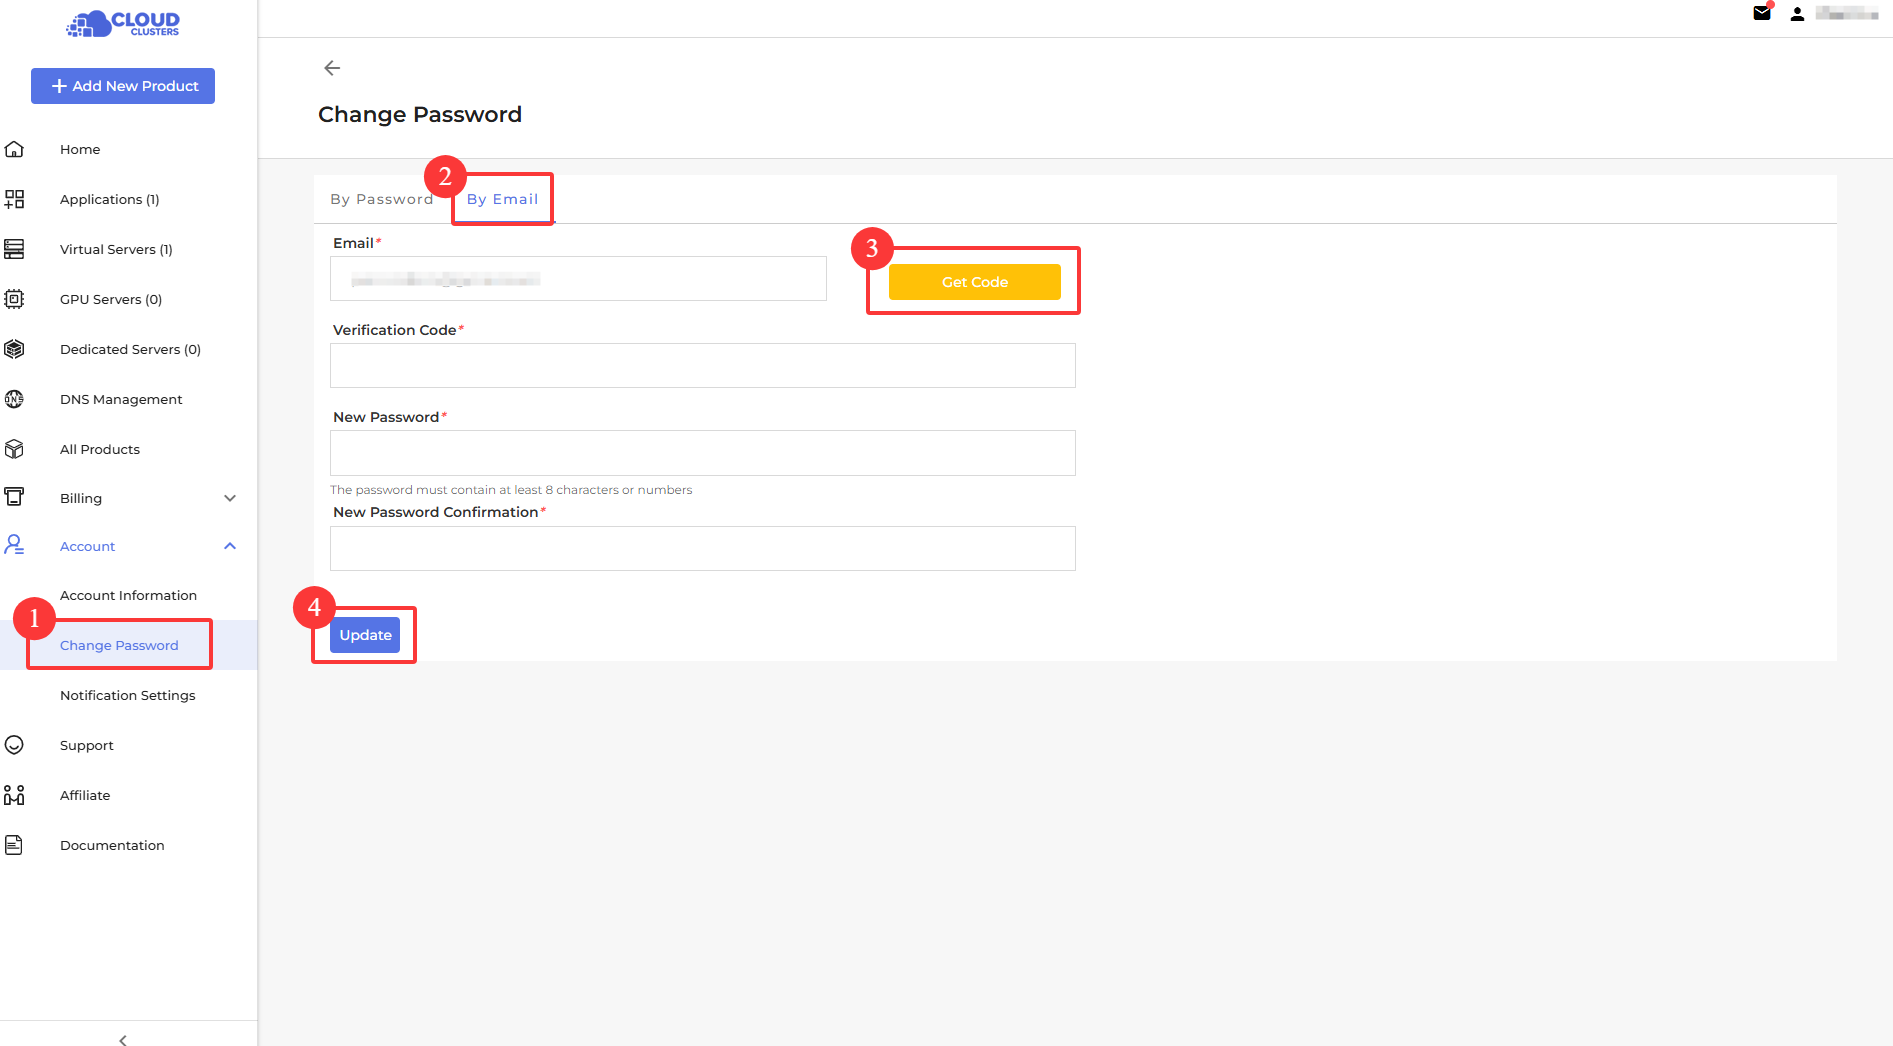
Account Password
The Account Password section explains how to manage and update your account password to keep your CCS Control Panel secure and accessible.
You can change your account password on the “Account > Change Password” page. Simply enter your current password or receive the verification code via email, set a new password, and click the Update button to complete the process.
- By Password
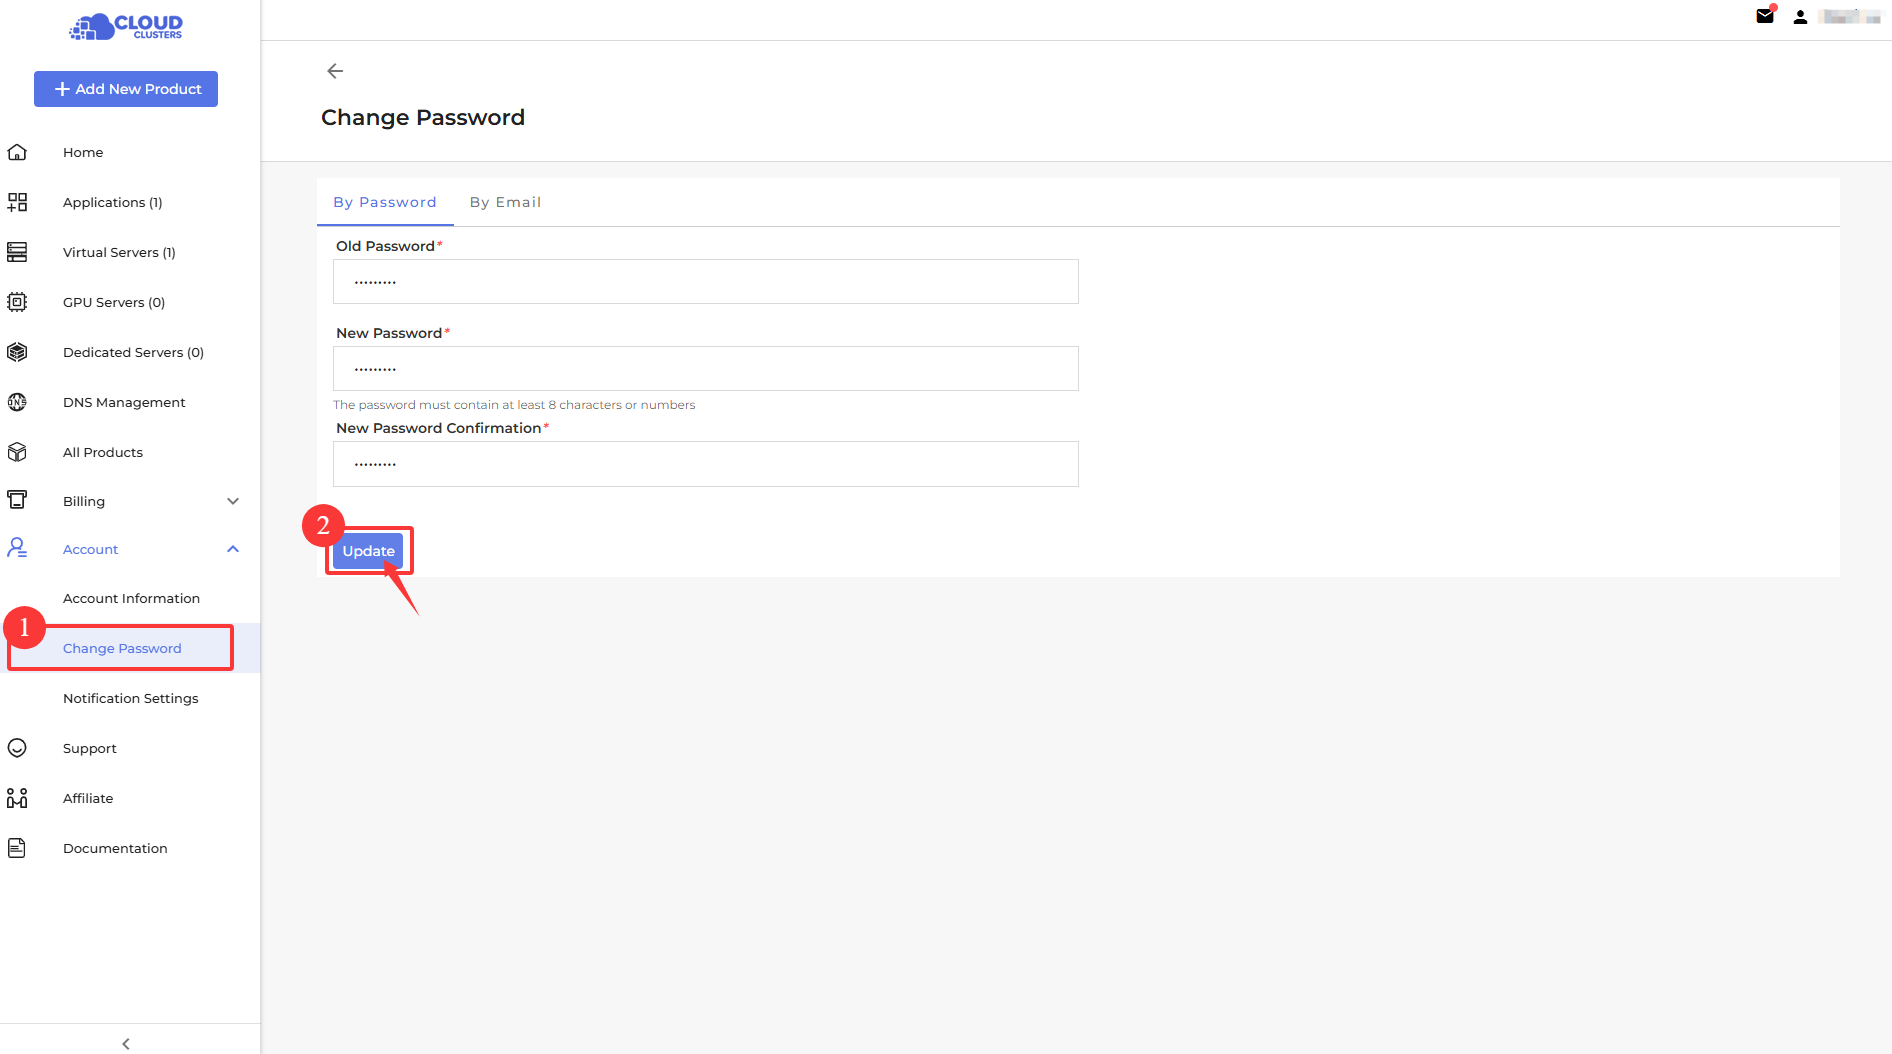
- By Email
Account Security
The Account Security section protects your account with automatic 2FA for suspicious logins, email alerts, and security reminders.
Automatic 2FA for Suspicious Logins
If the system detects unusual login activity, two-factor authentication (2FA) is automatically activated. This ensures that only you can access your account, even if your password is compromised.
Email Notifications
You will receive real-time email alerts for security-related events, such as login attempts from new devices or locations. These notifications help you stay informed and respond quickly to potential threats.
Security Reminders
To help keep your account and personal information safe, we recommend:
- Securing your email account
- Choosing strong, unique passwords
- Keeping two-factor authentication (2FA) enabled
These simple steps greatly reduce the risk of unauthorized access and provide peace of mind.
Account Verification
The Account Verification section explains how account verification works, including the required billing details, when manual review may occur, and when extra KYC documents might be needed. This helps ensure smooth ordering and stable access to our services.
When you first register, your information is not automatically verified. However, when you need to order and use our services, we require you to provide the necessary billing information. Please make sure to enter accurate and truthful details to ensure your account functions properly and your orders are processed smoothly.
Account infomation
We typically only require basic information such as your name, country, state, city, postal code, and phone number.
Manual Verification
If your information is more complex, your account may need to go through manual verification. This process typically takes 2–4 hours.
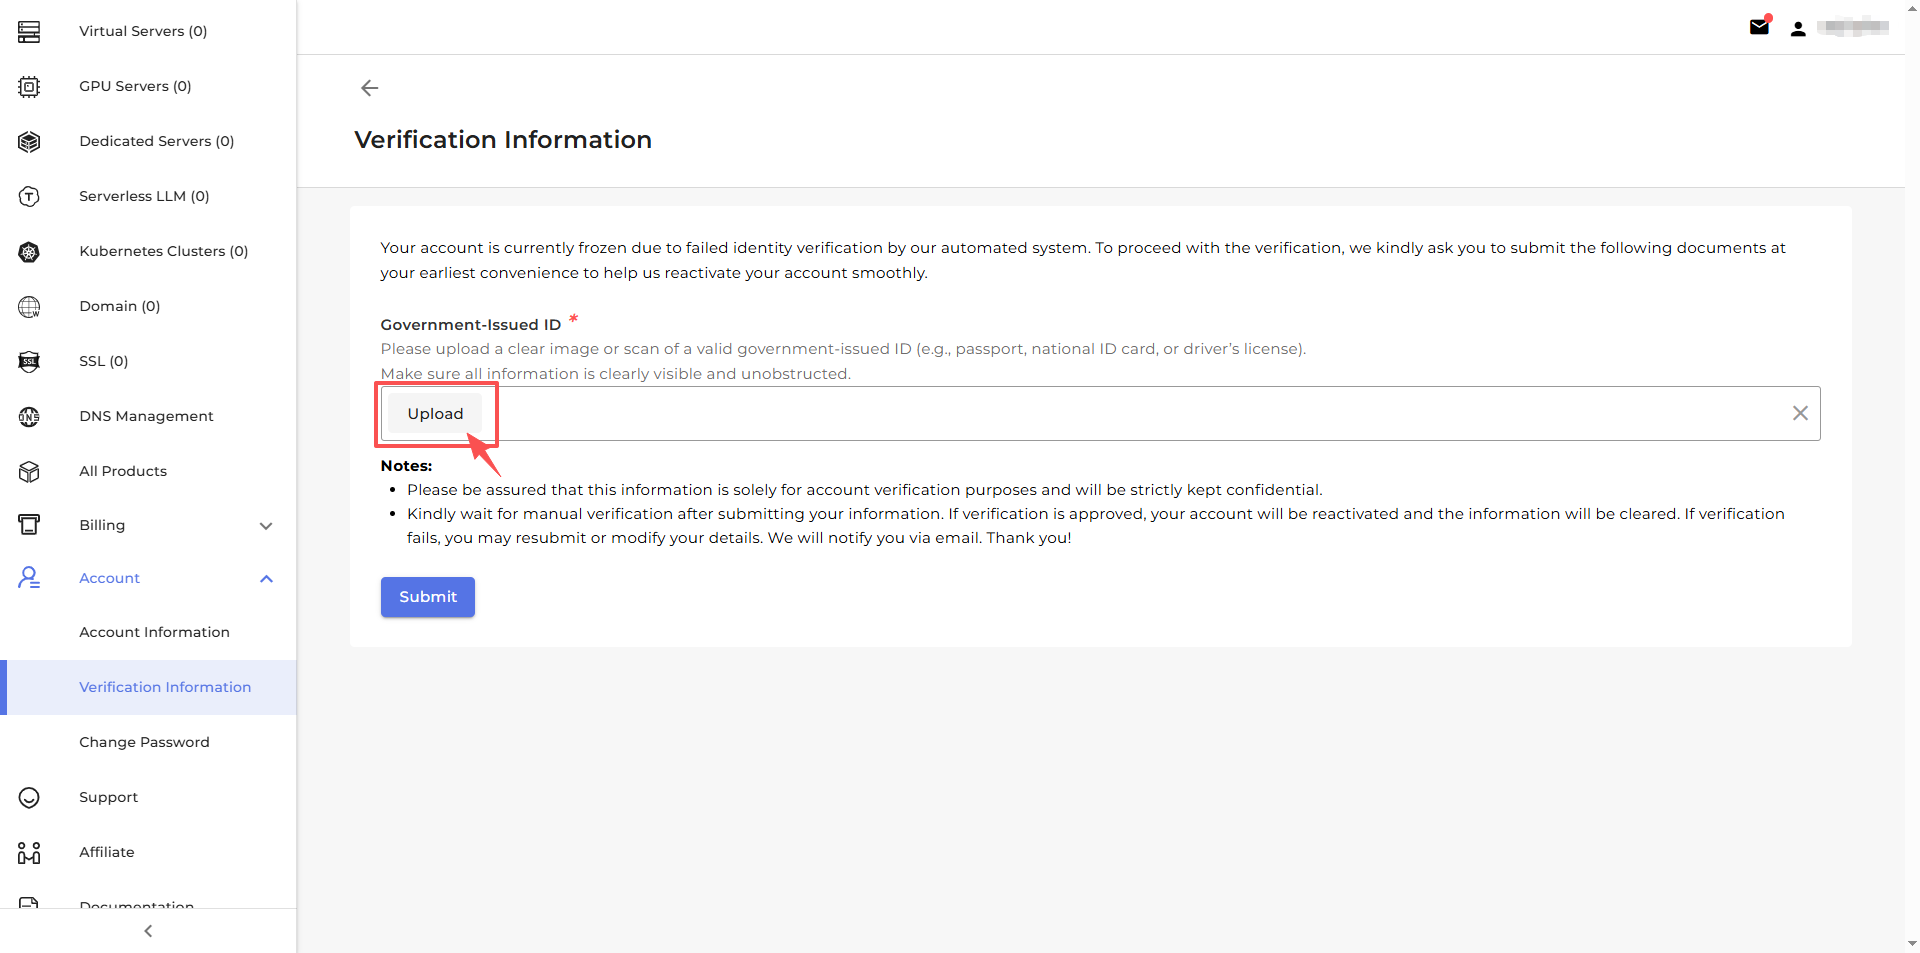
Additional KYC Verification Documents
In certain special cases, the system may initiate a more advanced KYC process. You may be required to provide documents including, but not limited to:
- Government-issued identification
- A copy of your credit card
- Proof of recent transaction records
- Company business license or registration documents
Account Status
- Unverified: The account has been created but is not yet fully verified. Additional personal or billing information may be required before orders can be placed or all platform features can be accessed.
- Active: The account is fully verified and in good standing. All services and platform functions are available without restriction.
- Under Review: The account is undergoing manual review due to incomplete information, unusual activity, or additional verification requirements. Certain actions may be temporarily restricted until the review is completed.
- Closed: The account has been closed and is no longer active. Access to services and platform functionalities is disabled. Please contact support if assistance is needed.
Billing Operations
The Billing Operations section lets you view and filter invoices, make payments, and add funds for easy billing management.
Invoice
The Invoices page provides a centralized place to manage all your billing records on the platform. It allows you to easily view, track, and process payments for all services, including servers, SSL, domains, and more.
Find invoices
You can filter invoices by Invoice ID, Due Date, Date Paid, Status, and Service Name.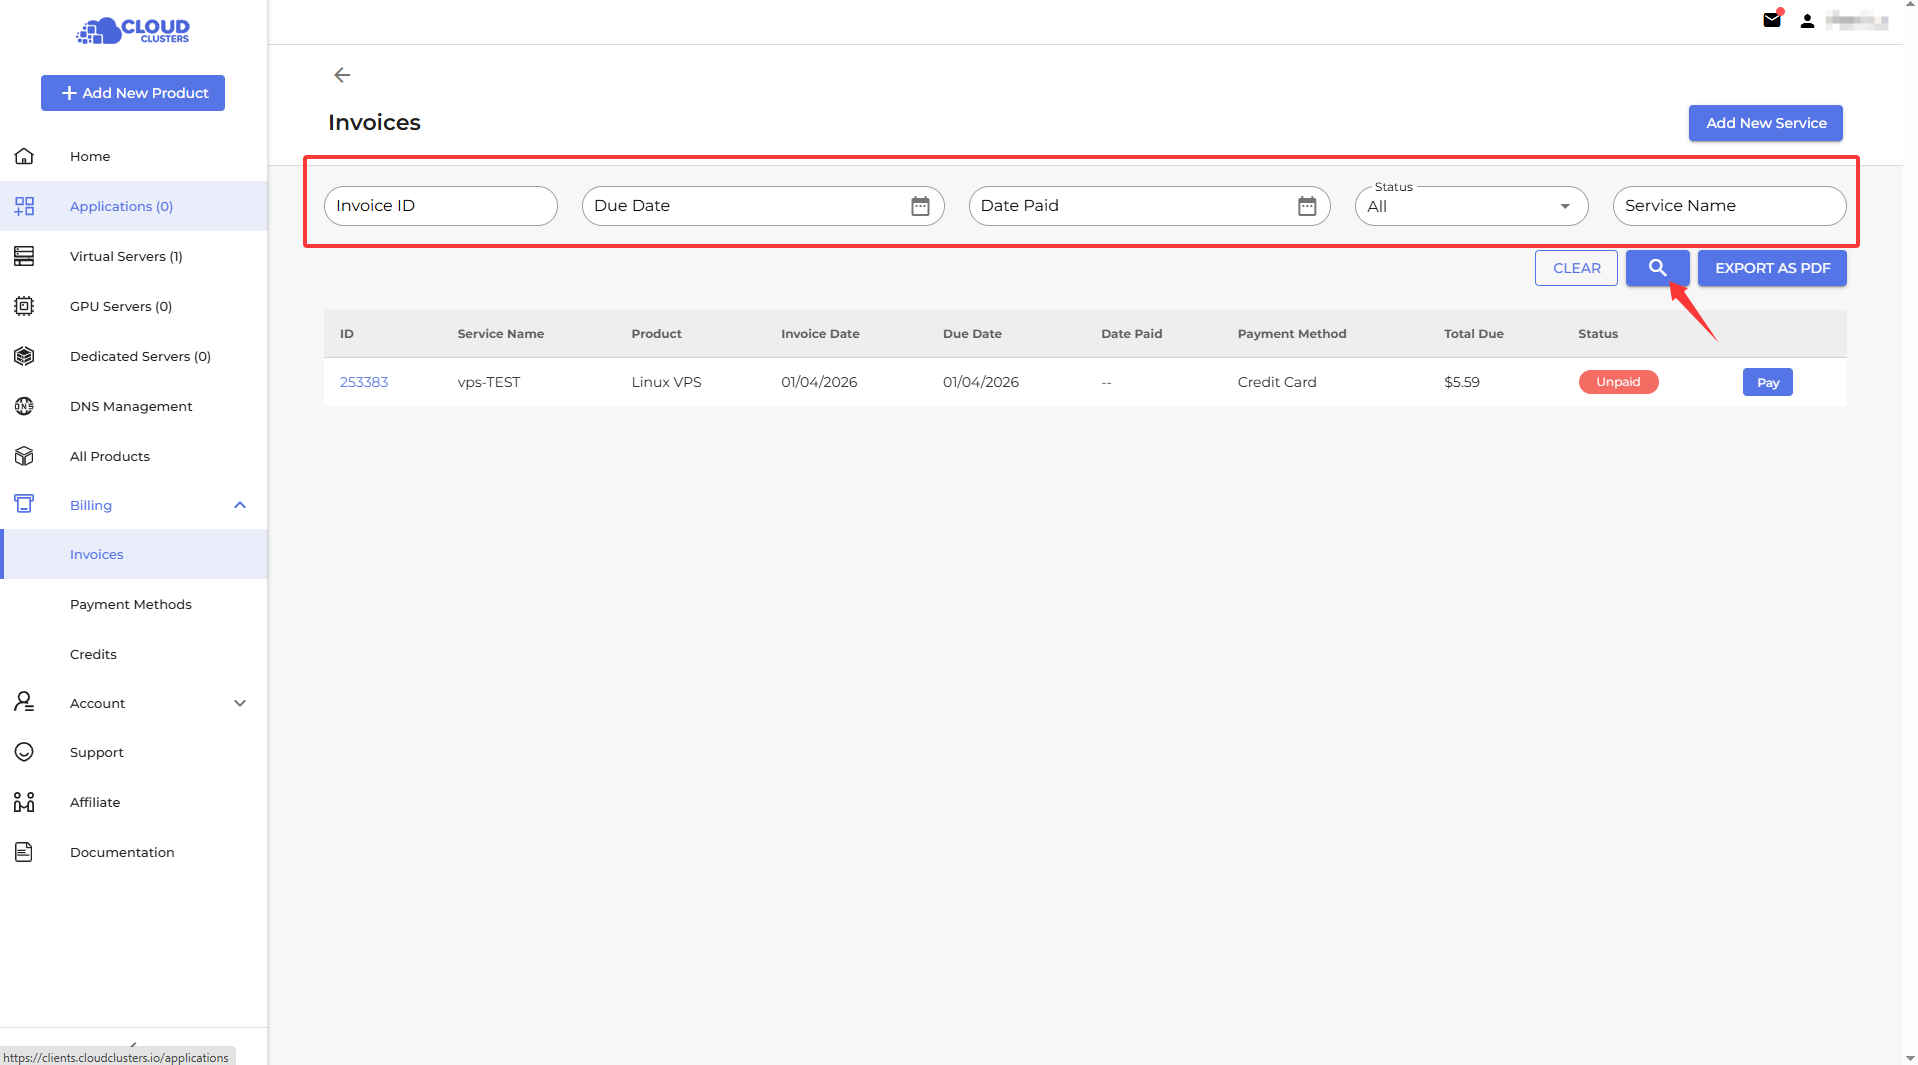
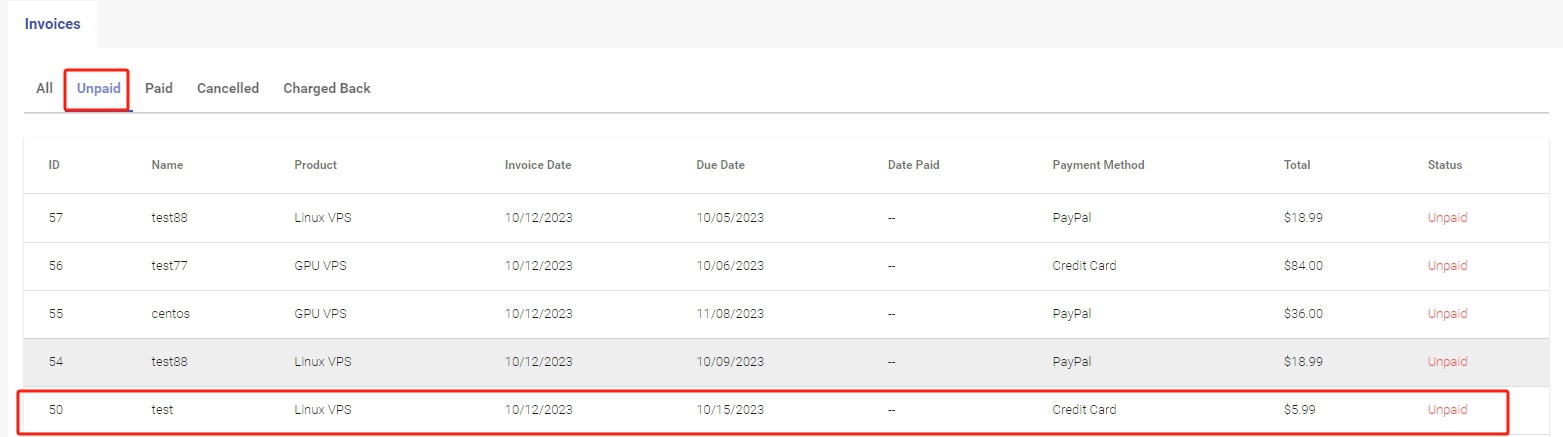
Pay for Invoices
For unpaid invoices, you can click ”Pay“ and complete the payment.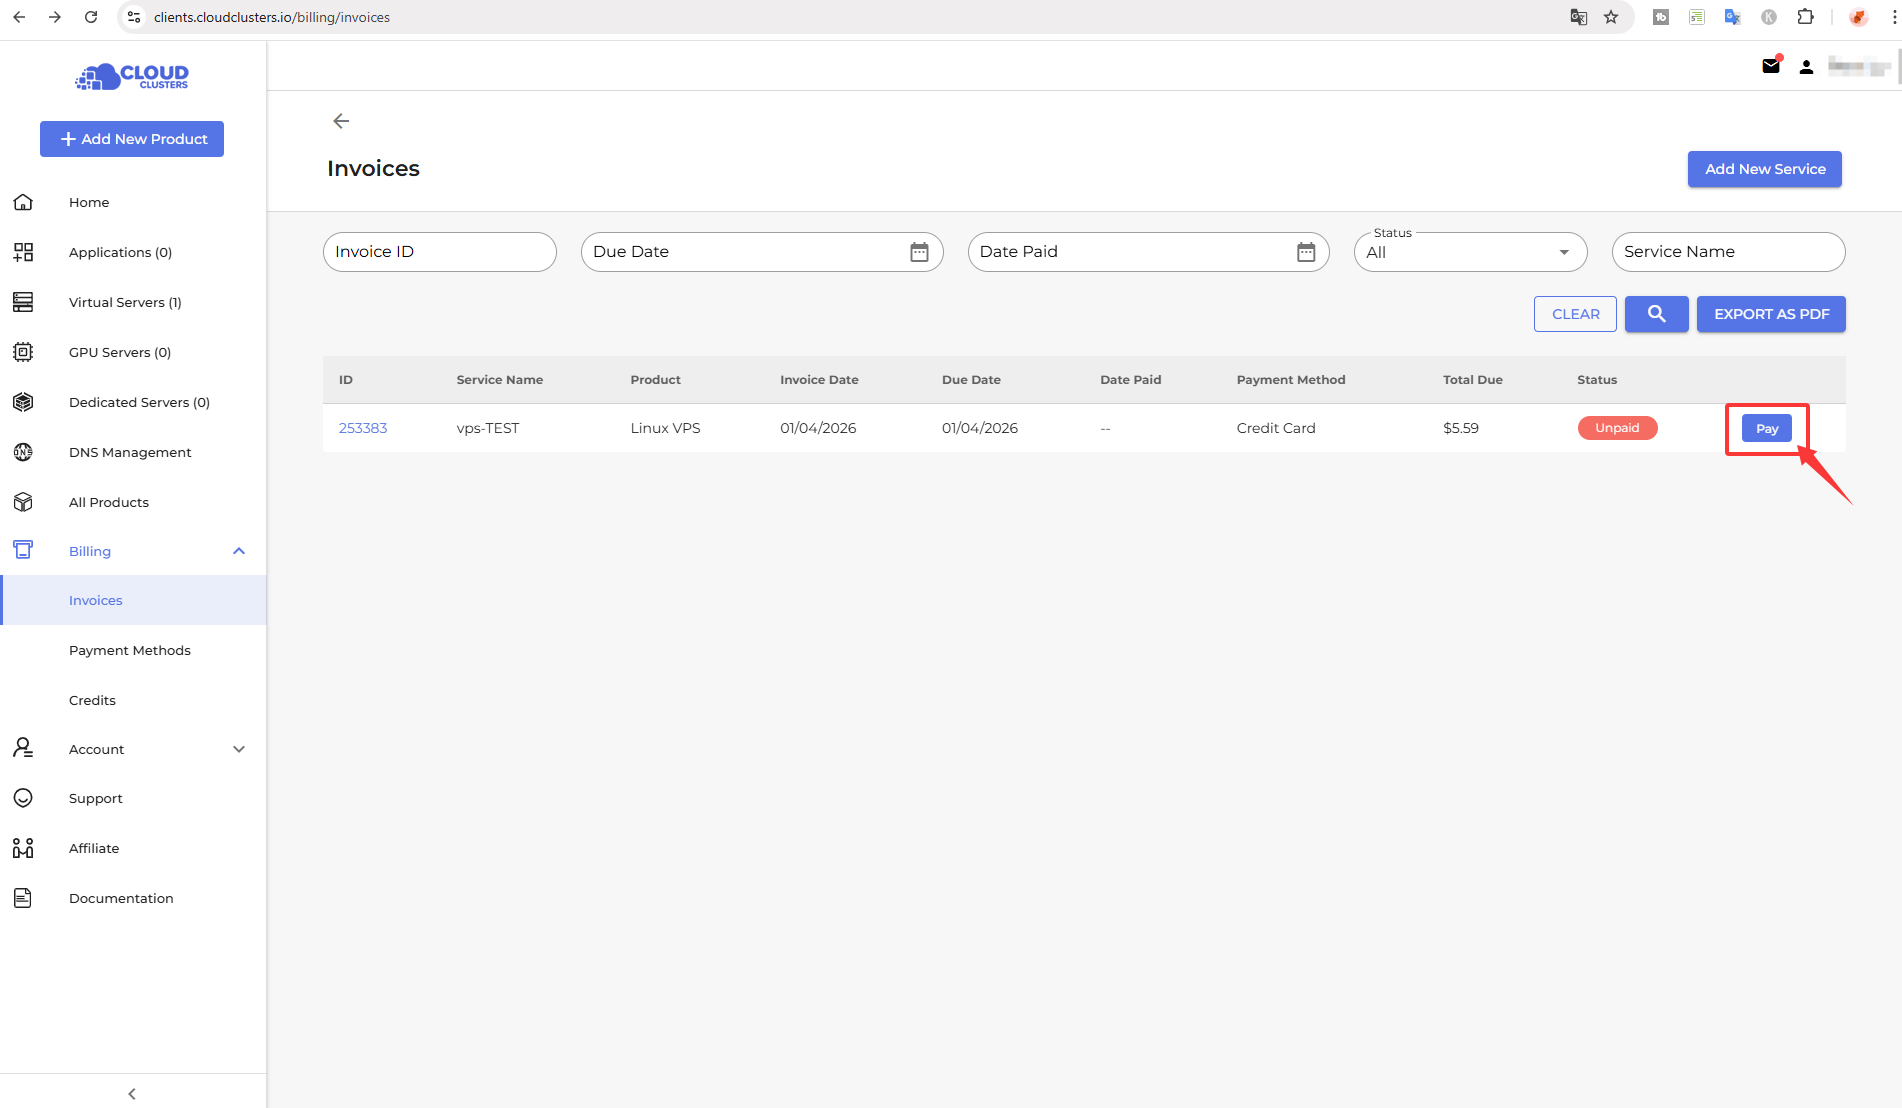
Payment Methods
- Add Credtit Card & Set up Auto-CC
- Step1: Go to Billing > Payment Methods.
- Step2: Click Add Credit Card.
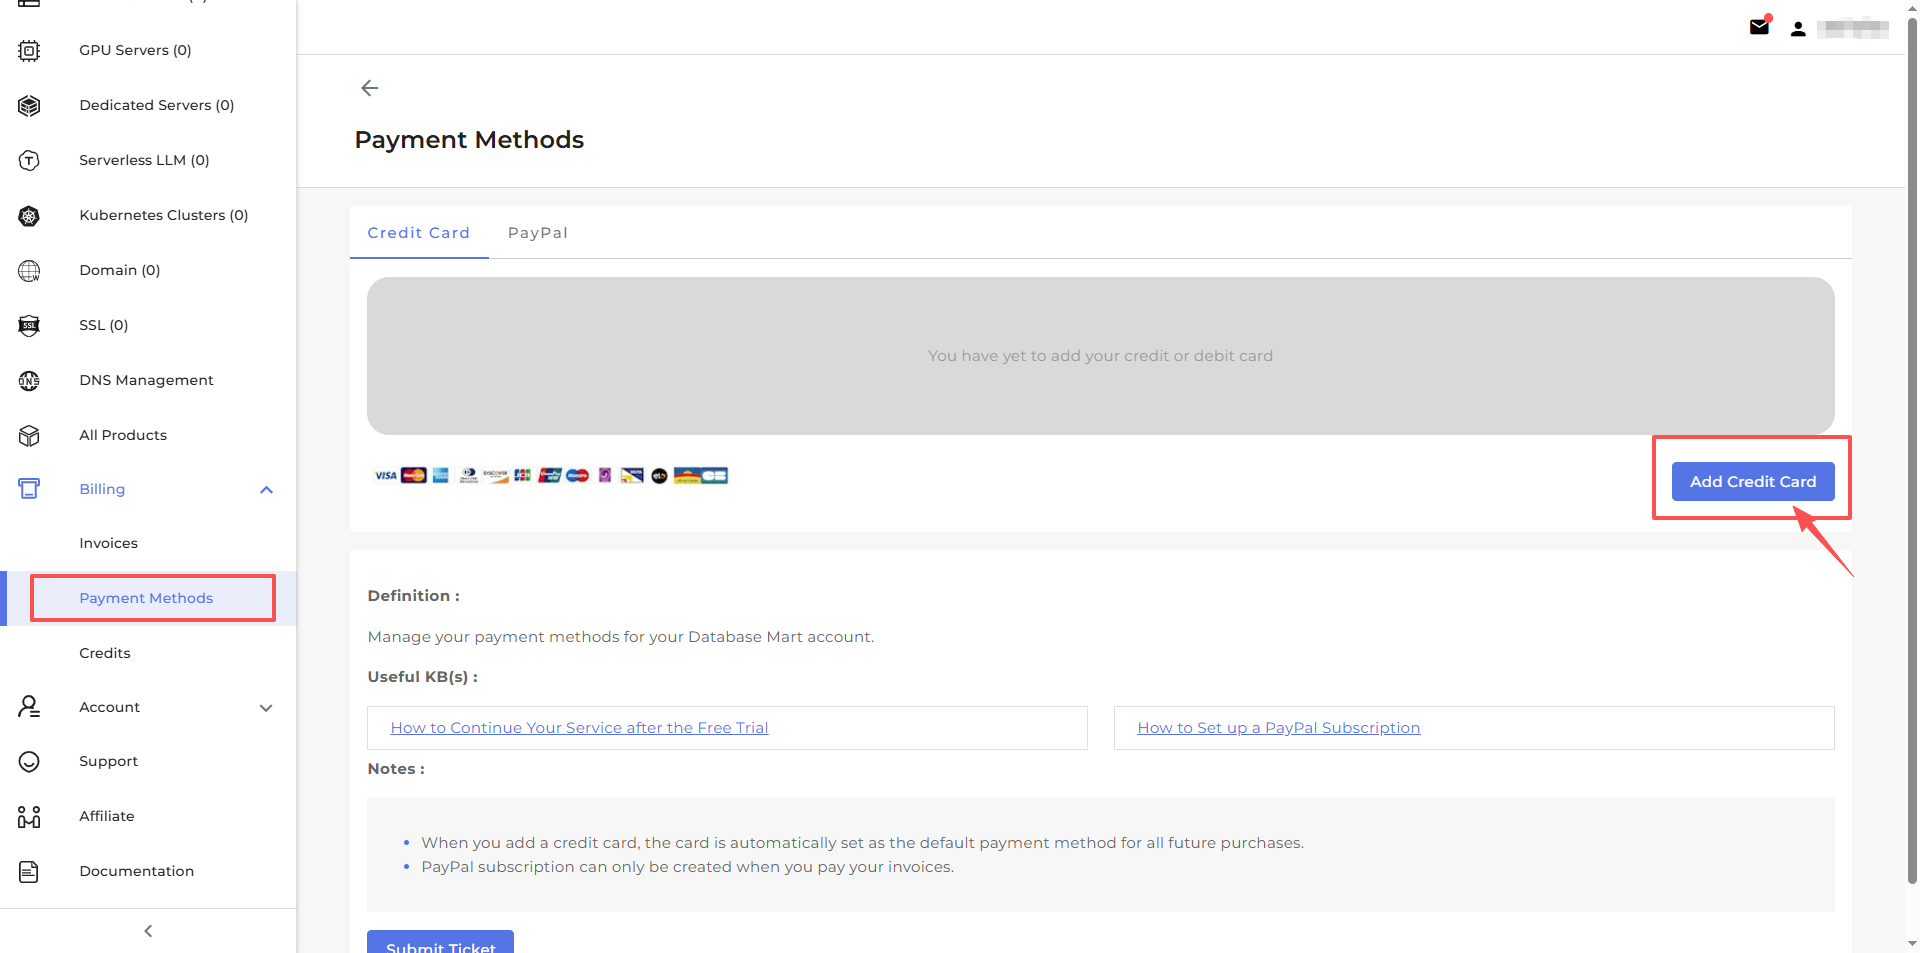
- Step3: Enter your card number or use the autofill link.
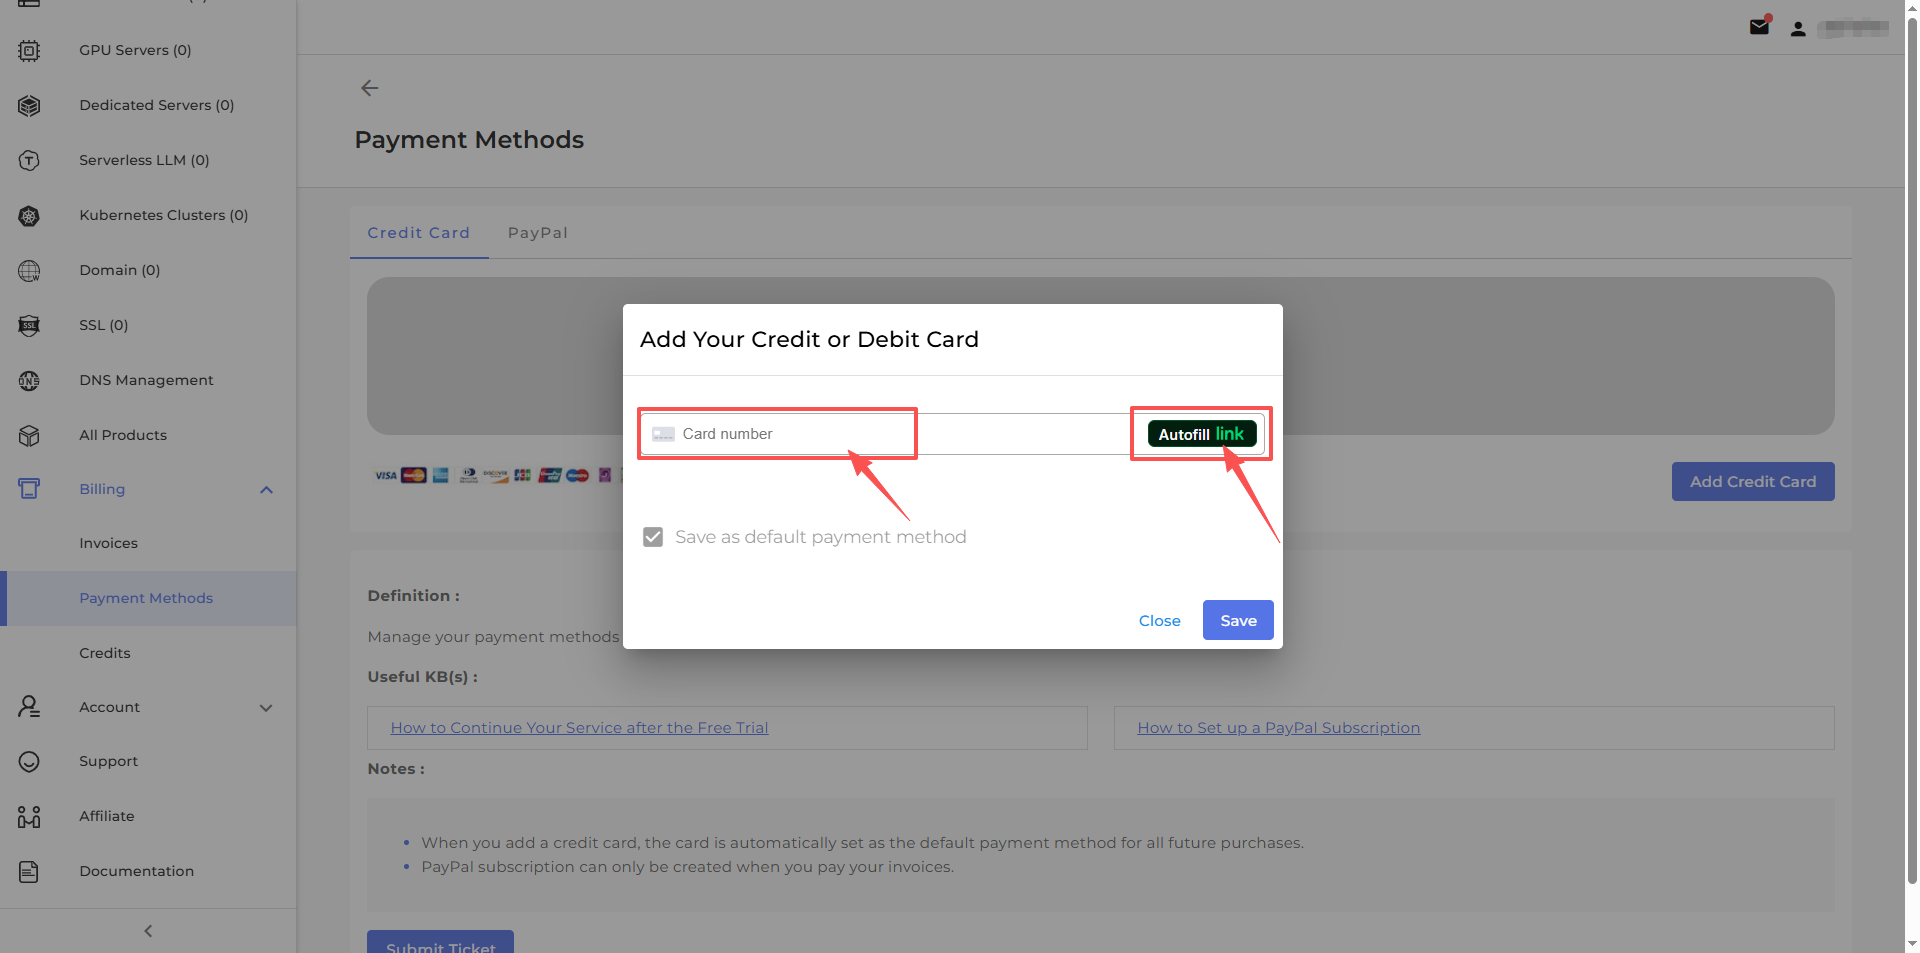
- Step4: Click Save to add the card.
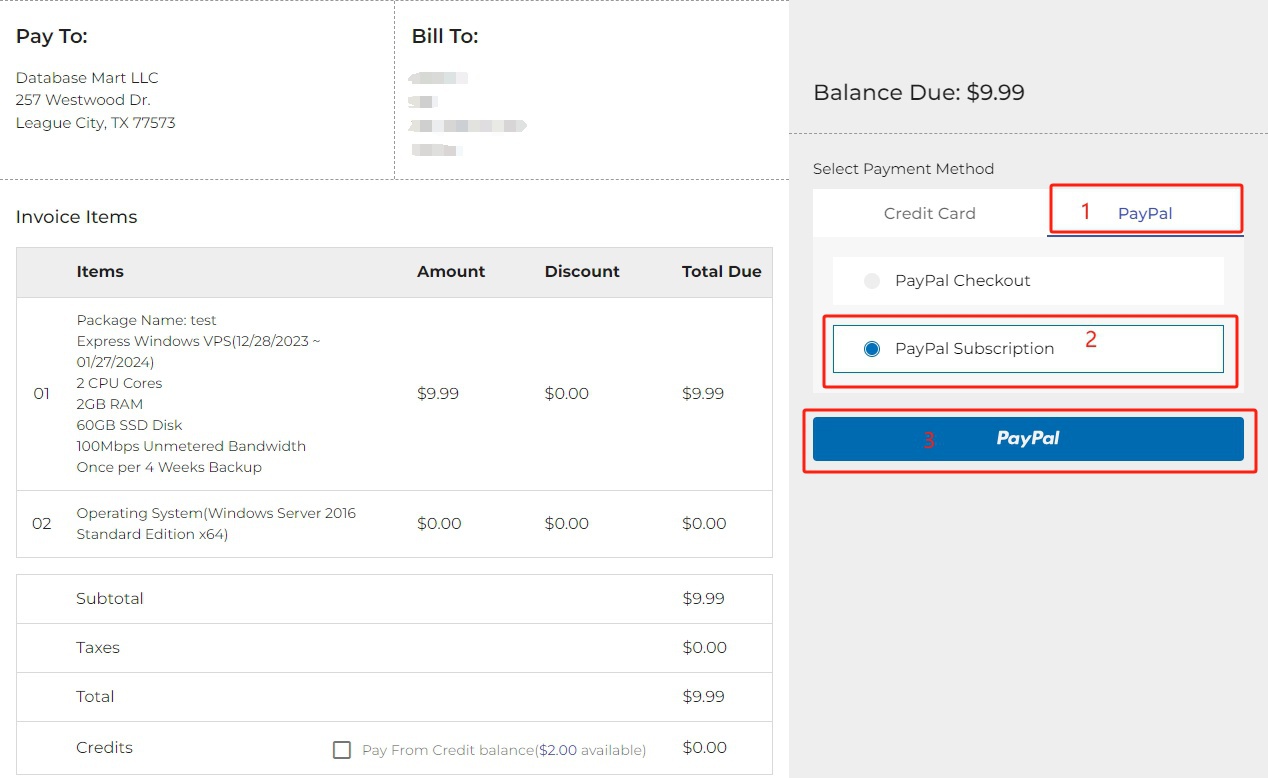
- Set up a Paypal Subscription
Step 1: Choose an unpaid invoice.
Step 2: Choose PayPal tab > PayPal Subscription > the PayPal button.
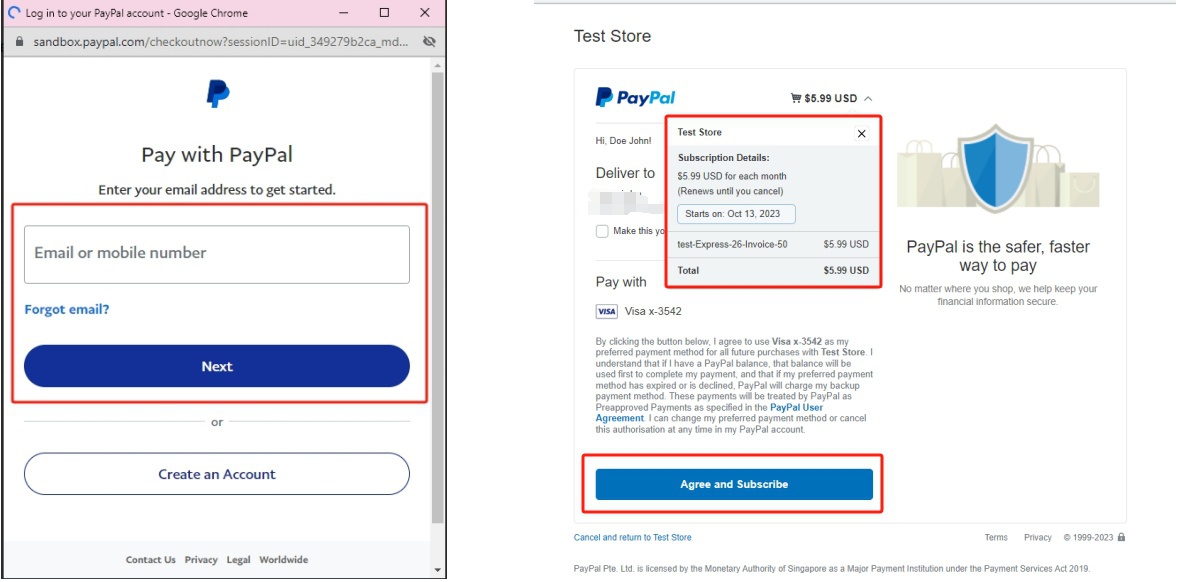
Step 3: Now you will be taken to Paypal website to complete your payment. Log in to your PayPal account with credentials. Click "Agree and subscribe."
Step 4: You can now go to the Payment Methods tab to view the PayPal subscription. If you would like to cancel the subscription, simply click the CANCEL button.
How to Handle Payment Failures
- When Credit Card Payment Failed:

-1. Make sure your credit card information, such as the card number, password, and expiration date, are correct.
-2. If a debit card is used, please make sure that there is sufficient fund for the payment. If a credit card is used, please make sure the payment is not exceeding the credit limit.
-3. Try making a payment a few moments later.
-4. Try a different browser to make a payment.
-5. Use a different card to pay.
-6. Change the payment method to PayPal.
-7. Contact your card issuing bank to authorize this transaction.
* When PayPal Payment Failed:
-1. Make sure your PayPal account and password are correct.
-2. Make sure your PayPal account has enough balance.
-3. Change the payment method to credit card.
-4. Check the email from PayPal for more information if your payment is On Hold.
Note: If the above methods do not resolve the issue, please contact us, so we can help investigate the reason for the failed payment.
Credits
- How to Add Funds
- Step1: Go to Credits > Add Funds.
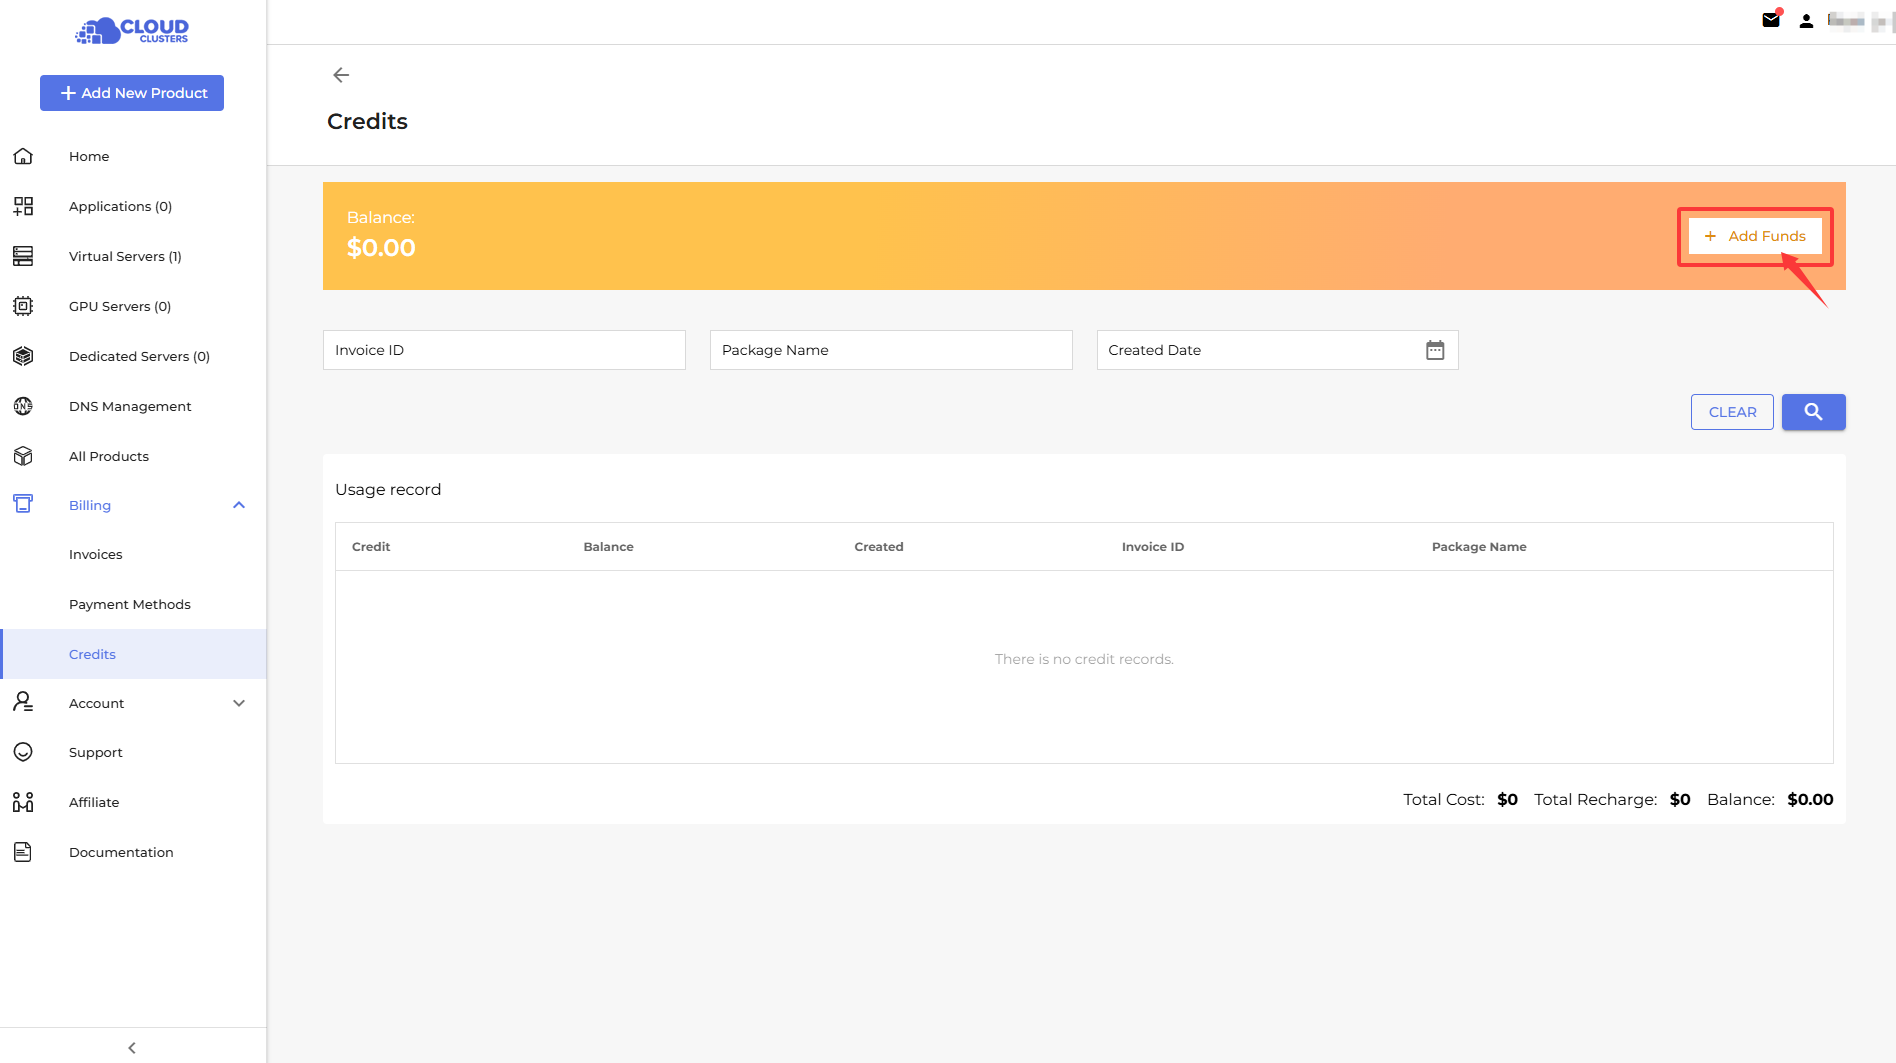
- Step2: Select your preferred payment method.
- Step3: Enter the amount you want to add.
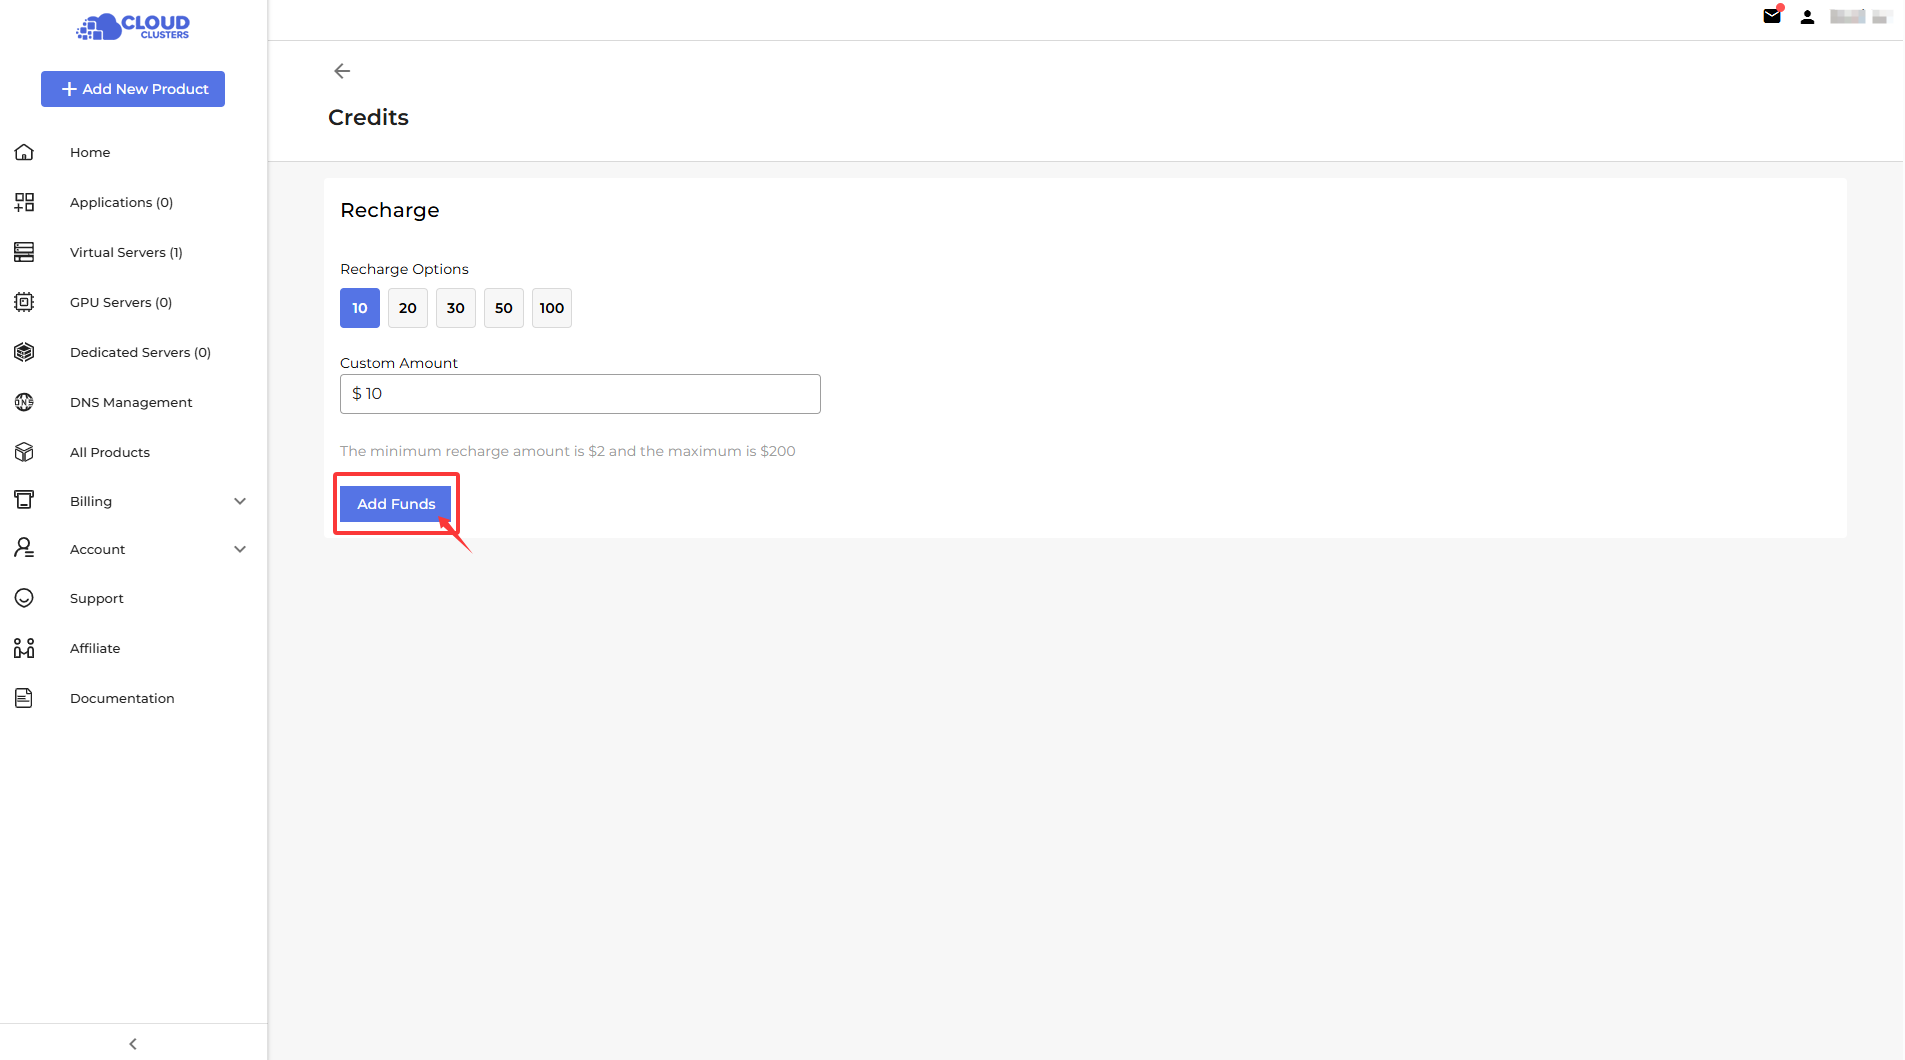
- Step4: Confirm the payment to top up your account balance.

- Step1: Go to Credits > Add Funds.
Note: If the message "Your account temporarily does not support this feature. Please contact the Billing team for further assistance" appears, it indicates that your account does not meet the top-up requirements set. You can contact our Billing team for help.
Customer Support
The Customer Support section provides 2 ways to get help. Use Online Chat for real-time assistance and quick questions, or Submit Ticket for detailed support, technical issues, or non-urgent inquiries.
Support>Open Documentation
A blog of articles on general, technical and financial questions with service of Connection, Application, Network and Security.Support>Submit Ticket
Submit a support ticket for issues that require detailed investigation or technical review. Our team will analyze your request and respond with a professional solution. This method is recommended for non-urgent matters, billing questions, or troubleshooting that may require additional information.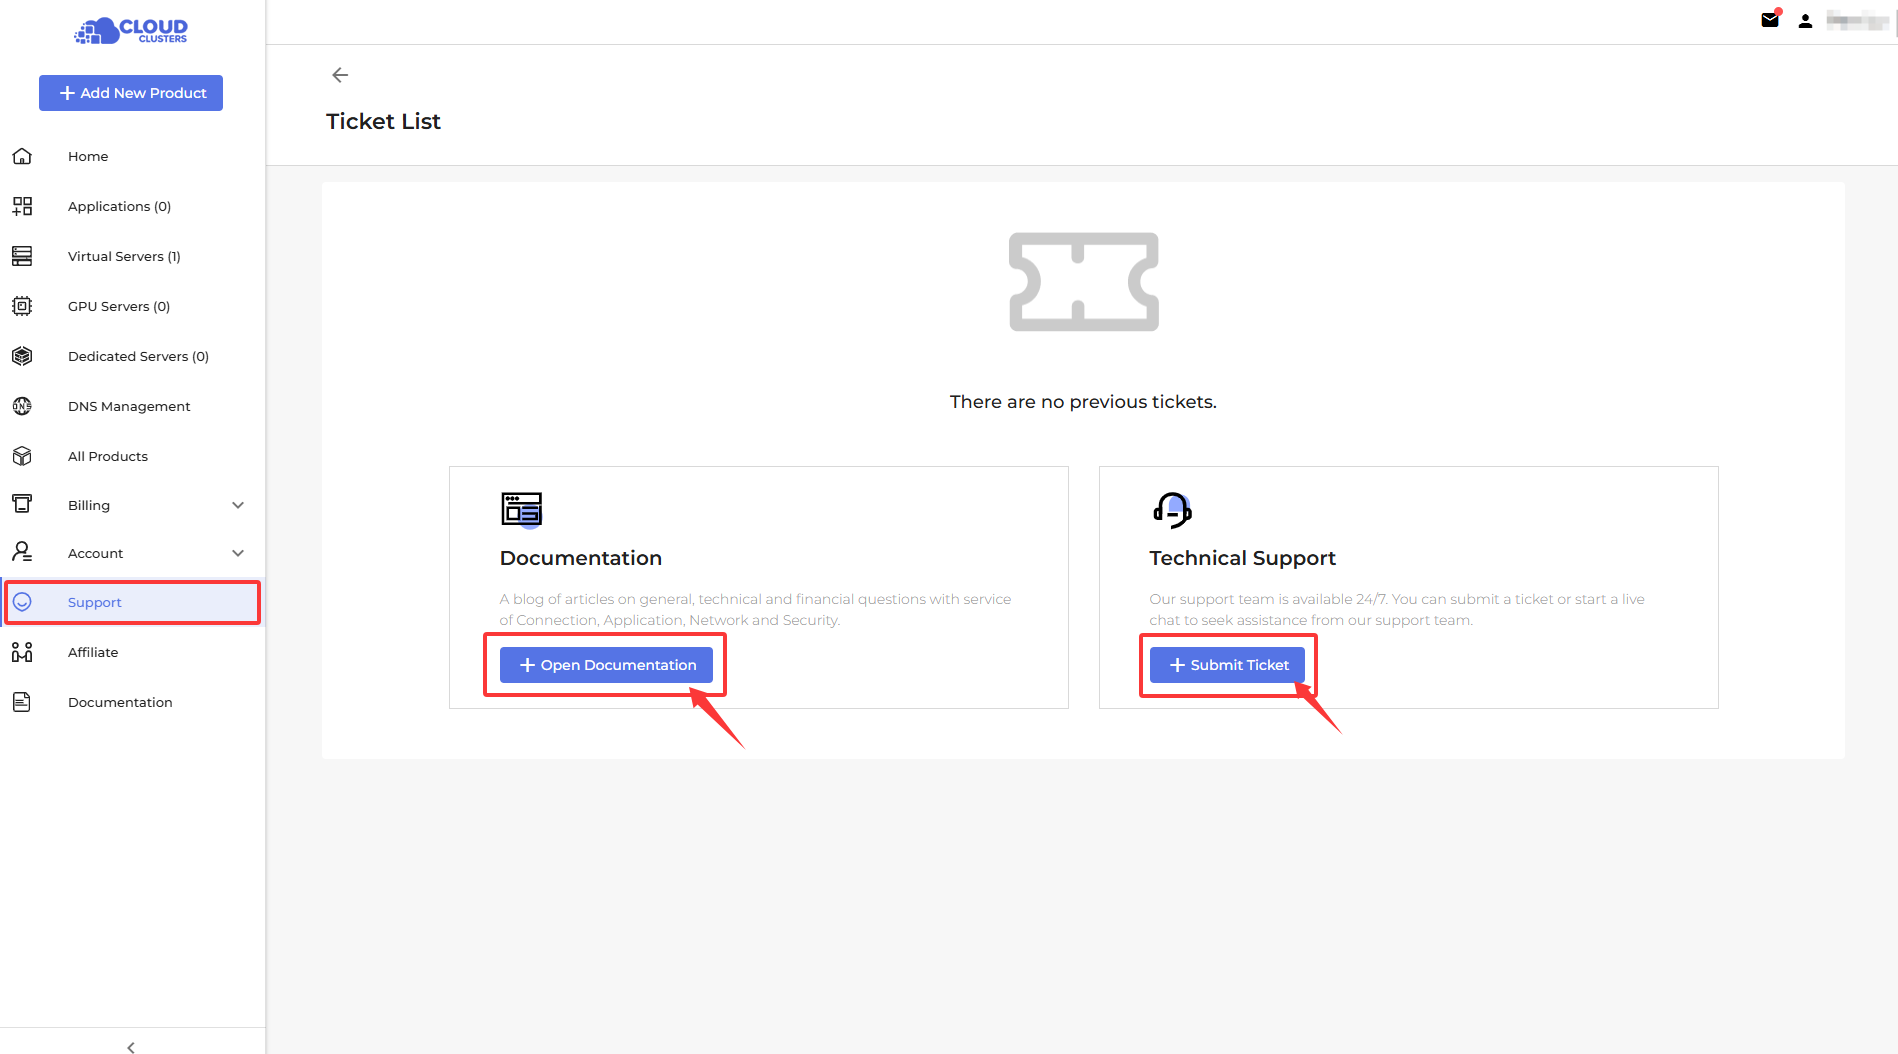
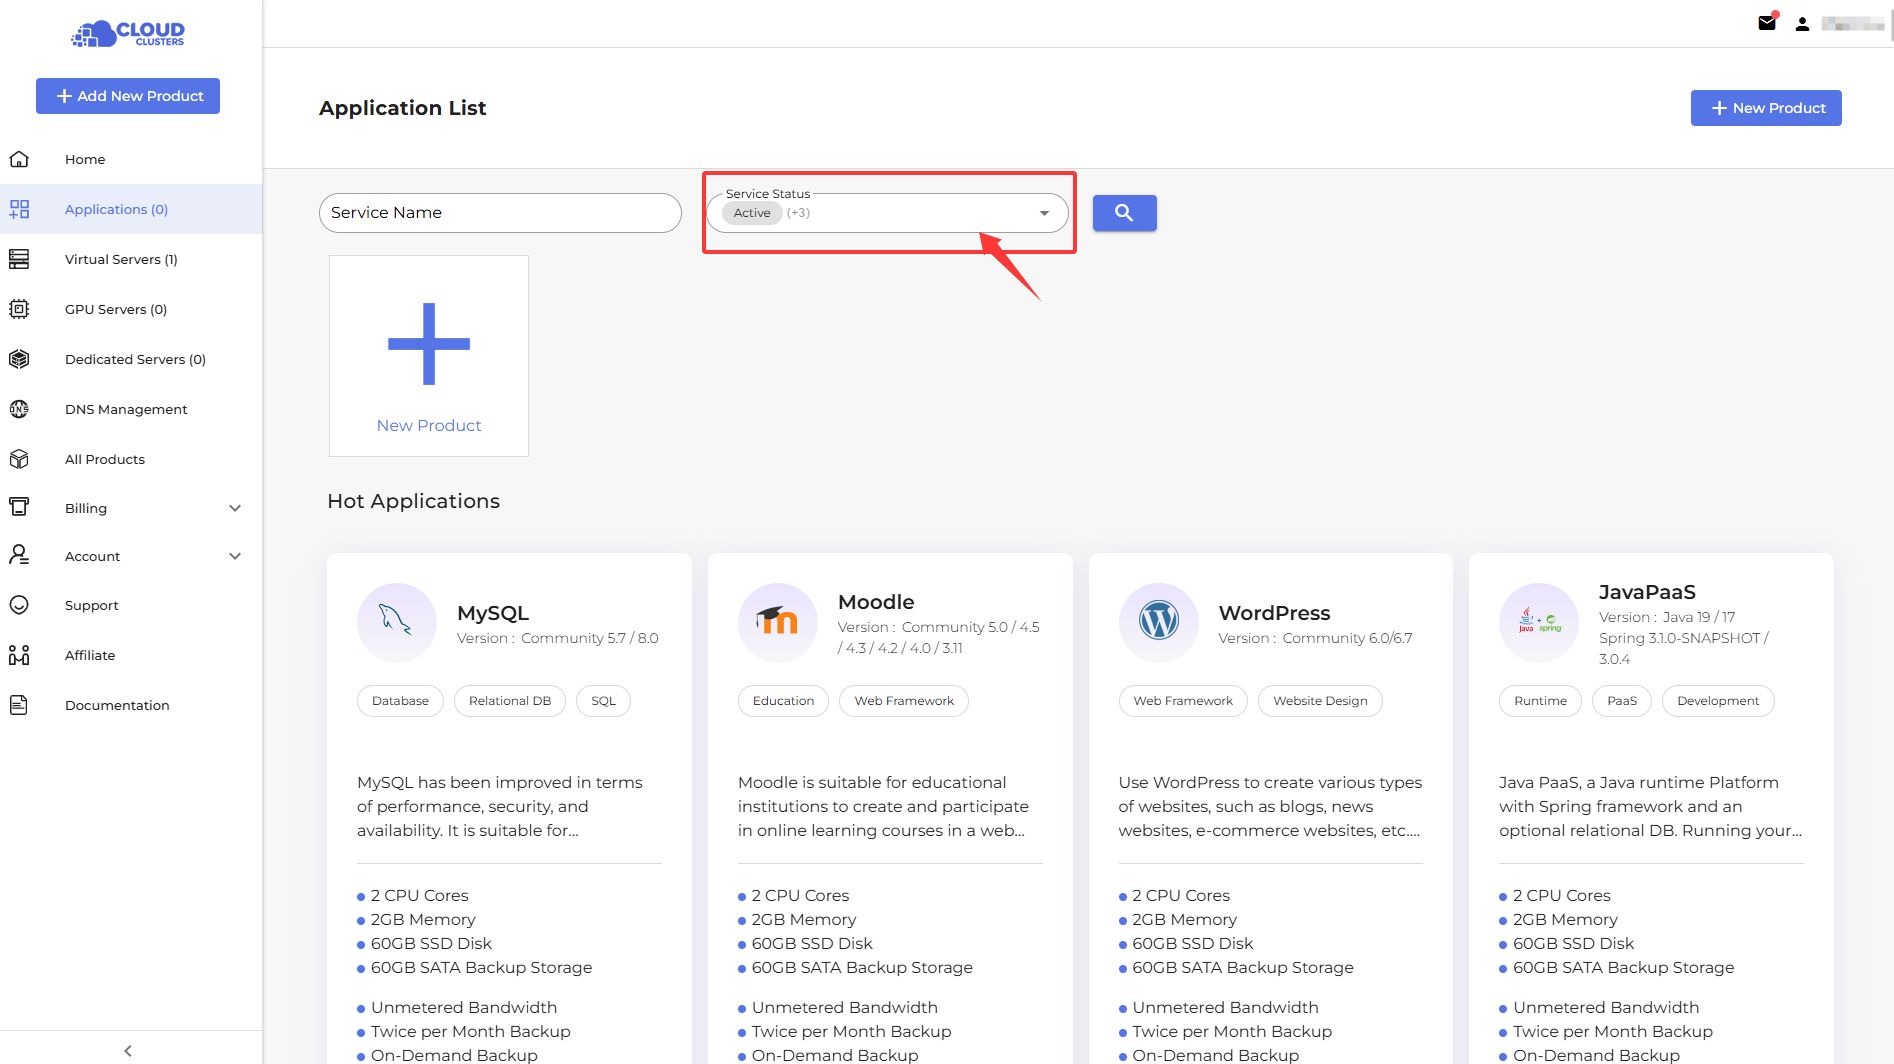
Service Management
Our control panel displays your services in different lists based on the products you have purchased. We provide a Applications List, Virtual Servers List, GPU Servers List, and Dedicated Servers List. After purchasing a service, you can view it on the corresponding list page, where you can also perform the following actions.
Below are some operation documents to help you easily start ordering and using our services from scratch.
- Windows VPS: https://www.cloudclusters.io/docs/vps/
- Linux VPS: https://www.cloudclusters.io/docs/vps/
- Dedicated Server: https://www.cloudclusters.io/docs/dedicatedserver/
- GPU VPS Server: https://www.cloudclusters.io/docs/gpuserver/
- GPU Dedicated Server: https://www.cloudclusters.io/docs/gpuserver/
- Odoo: https://www.cloudclusters.io/docs/odoo/
- SQL Server: https://www.cloudclusters.io/docs/sqlserver/
- ERPNext: https://www.cloudclusters.io/docs/erpnext/
- Get More Guidance: https://www.cloudclusters.io/document
Service Status:
- **Unconfirmed: **The service has been created, but the payment process has not started.
- Pending: The service has been created, but payment is incomplete, or payment has been received and deployment is still in progress.
- Active: The service is fully provisioned and operating normally.
- Suspended: The service still exists but is temporarily disabled (such as due to overdue payments, cancellation request, policy violations, or the agent pausing it manually). Data is usually retained, and the service can typically be restored.
- **Cancelled: **The service is permanently terminated and will no longer incur charges. Once canceled, it usually cannot be restored and will be deleted.
View Active/Suspended/Pending/Unconfirmed/Cancelled Service
Change Server Password
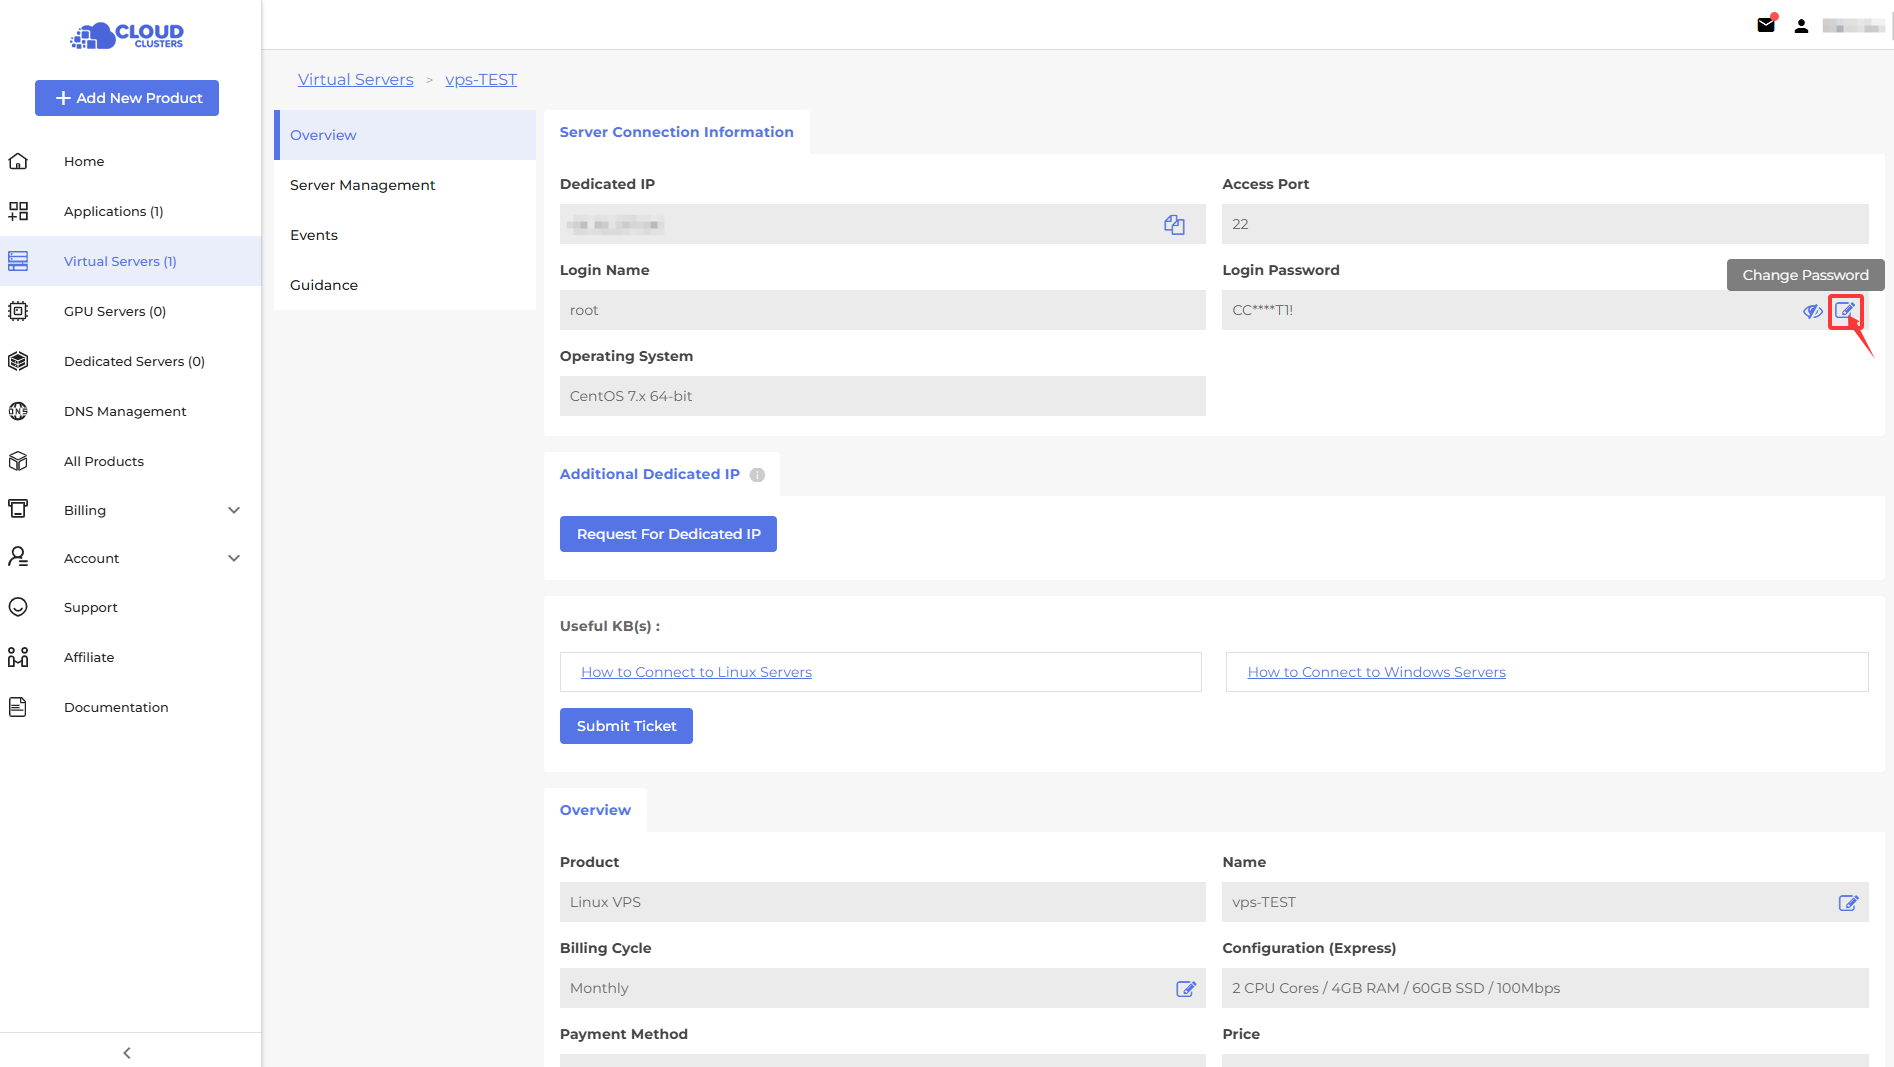
Change Service Name
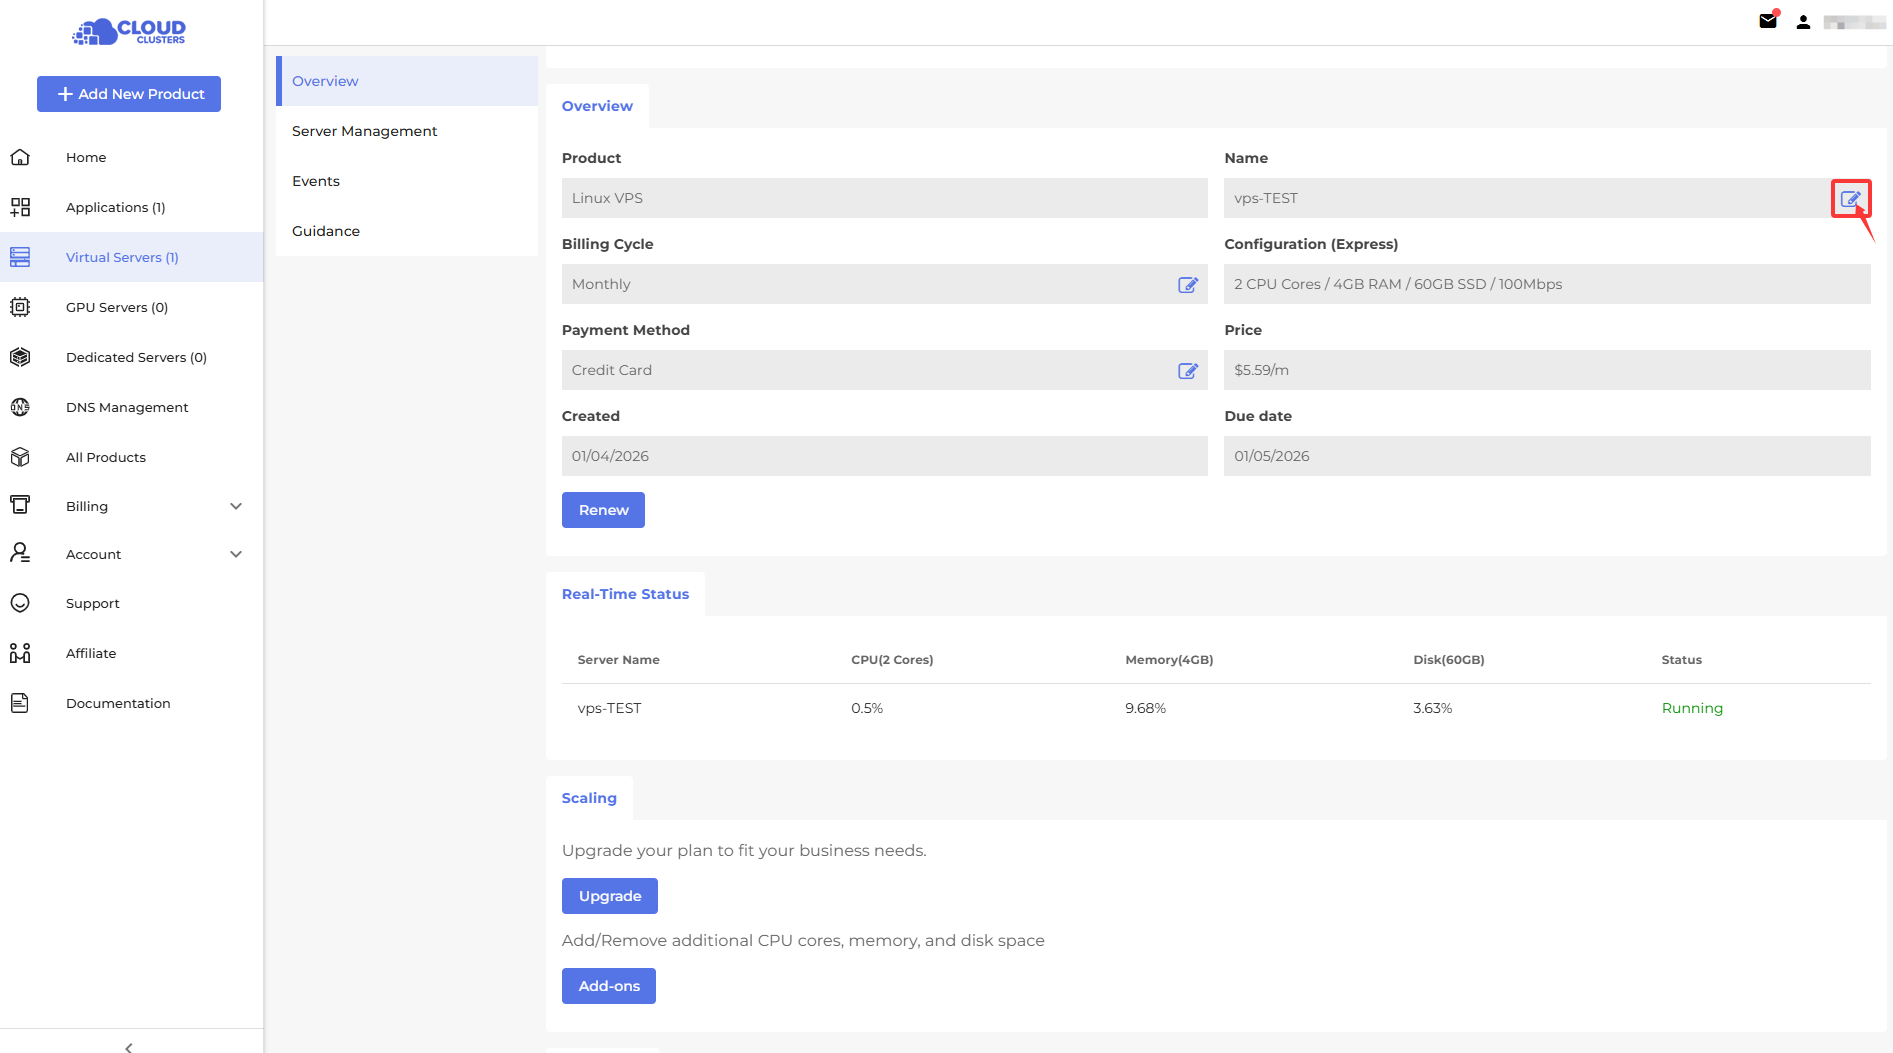
Change Billing Cycle
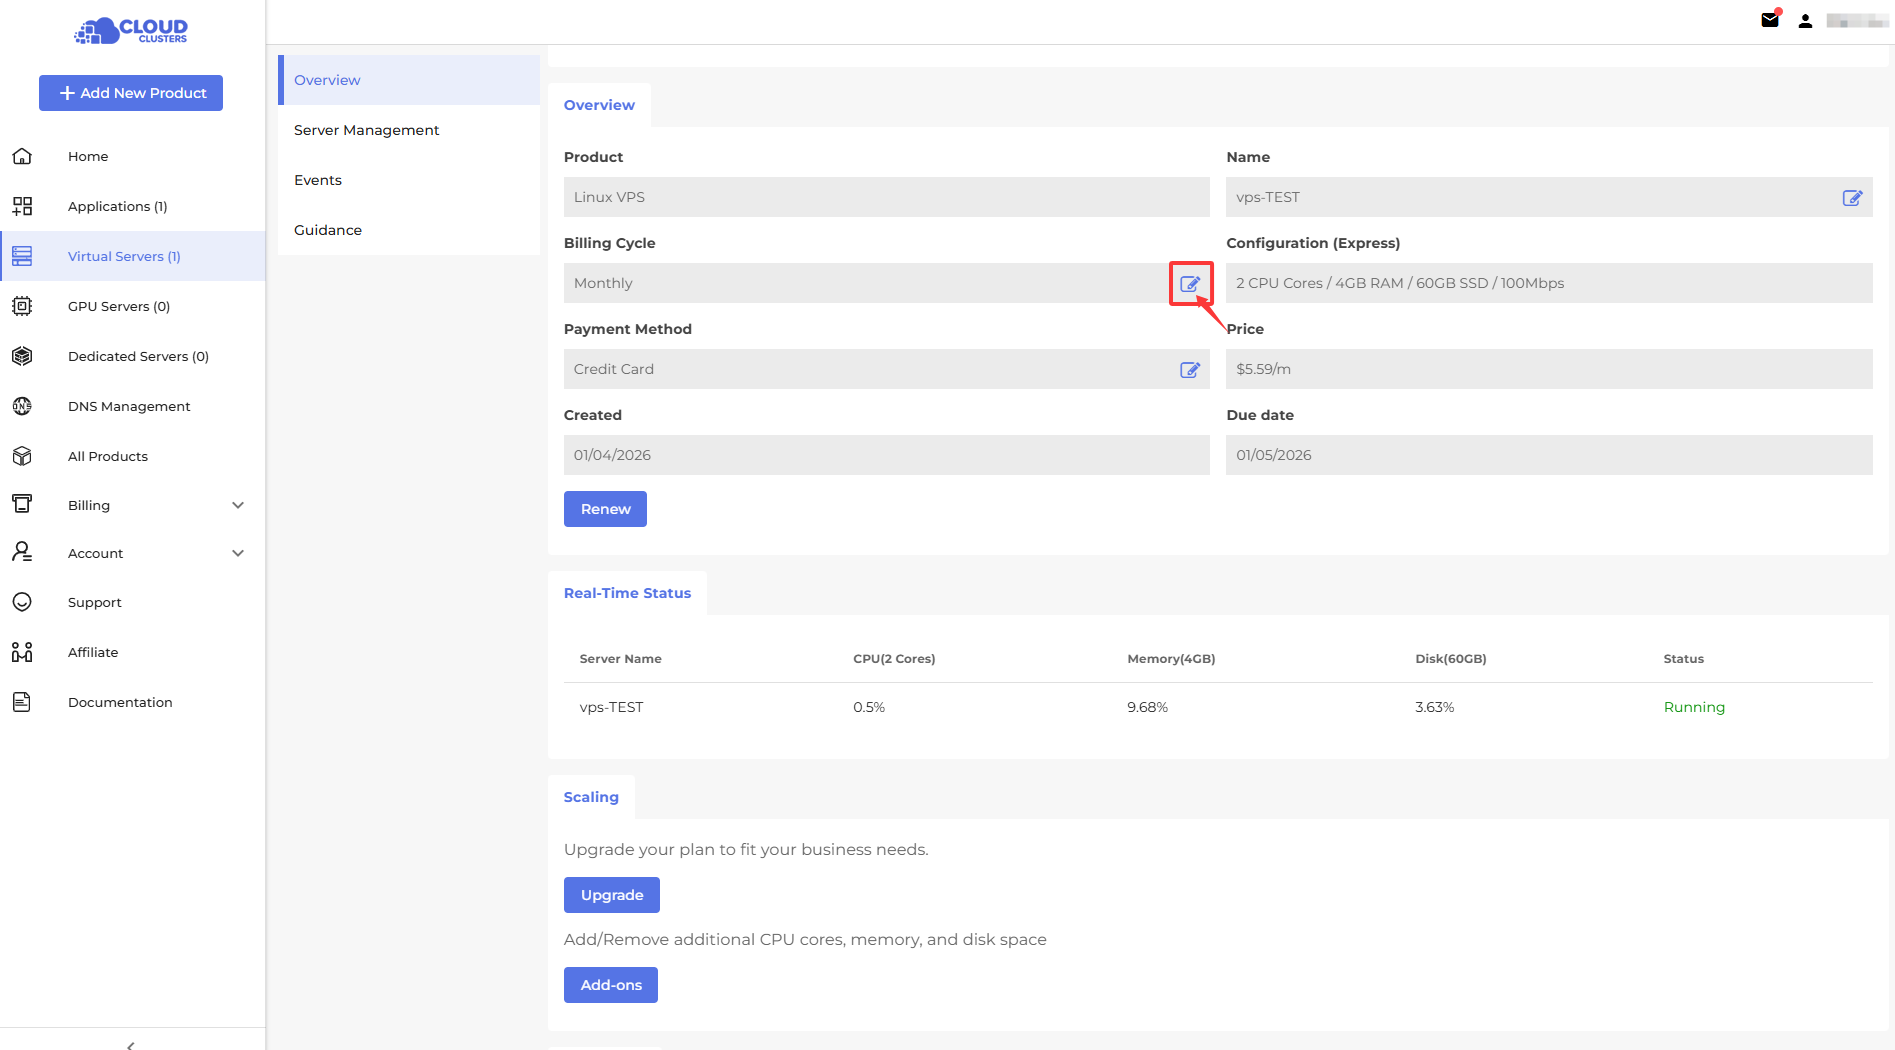
Change Payment Method
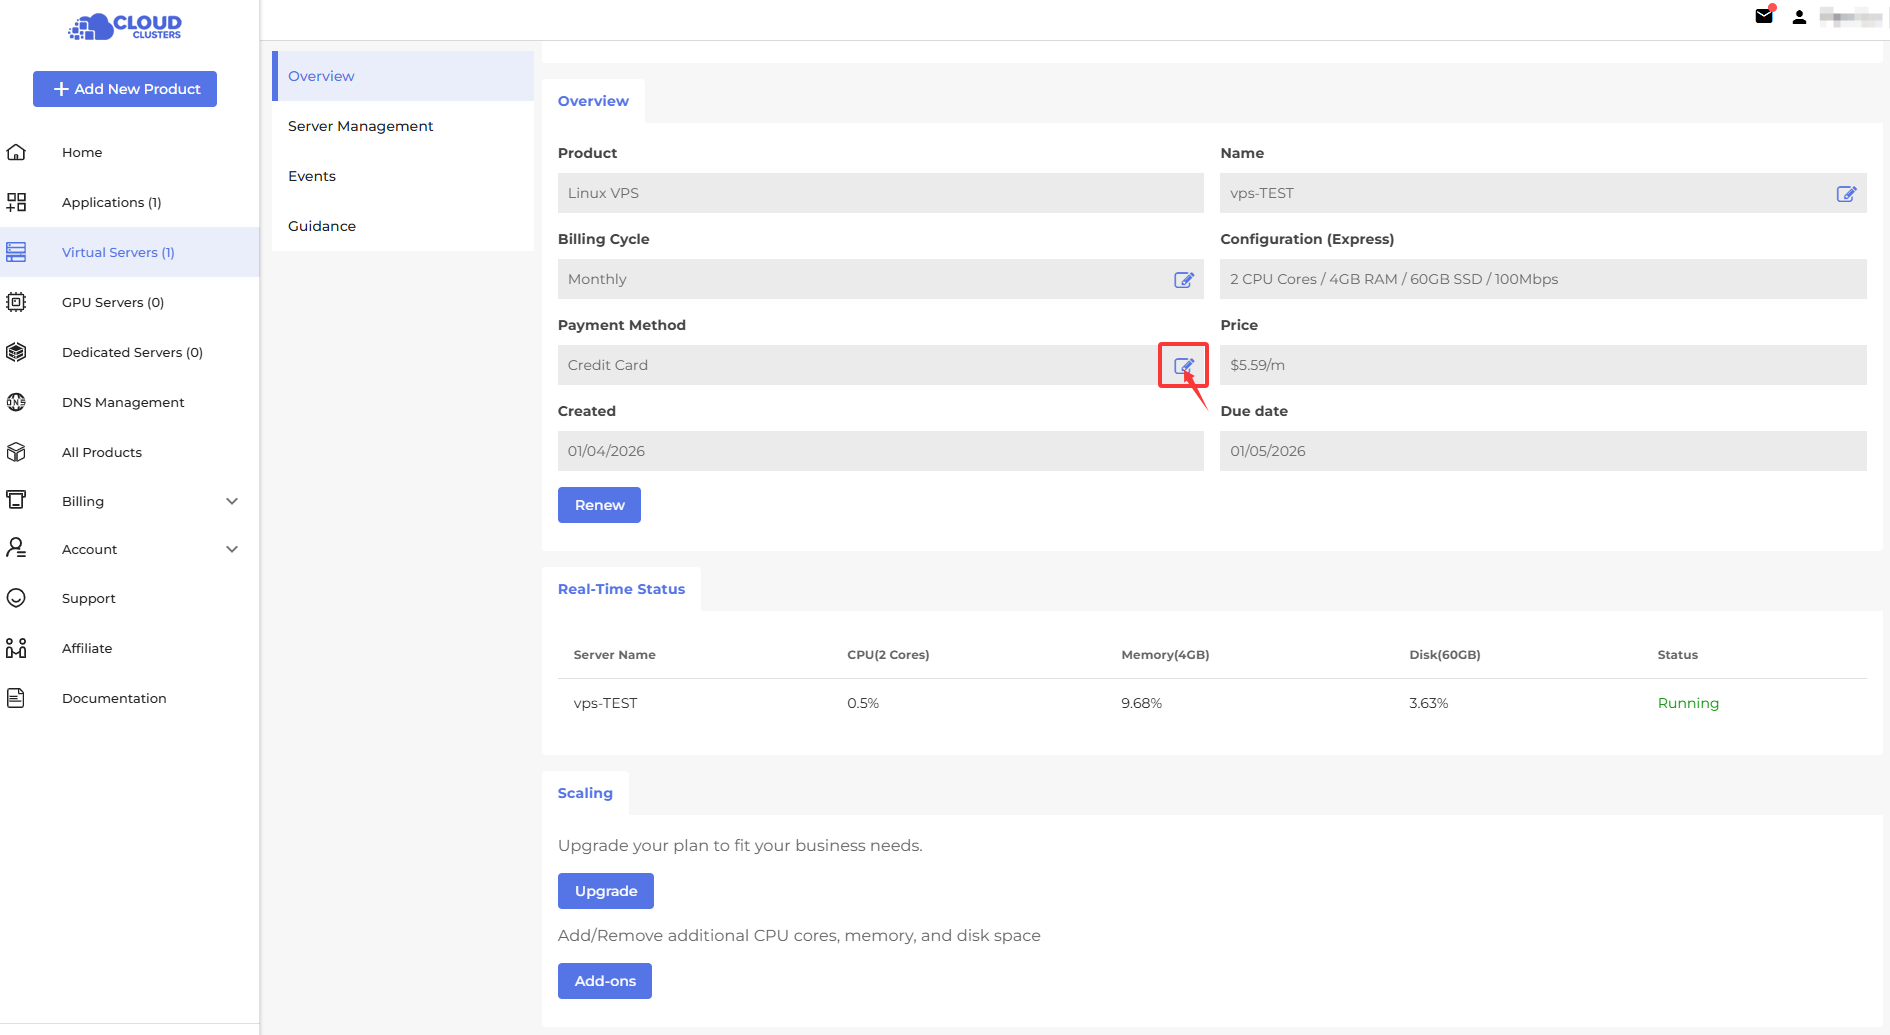
Service Renew
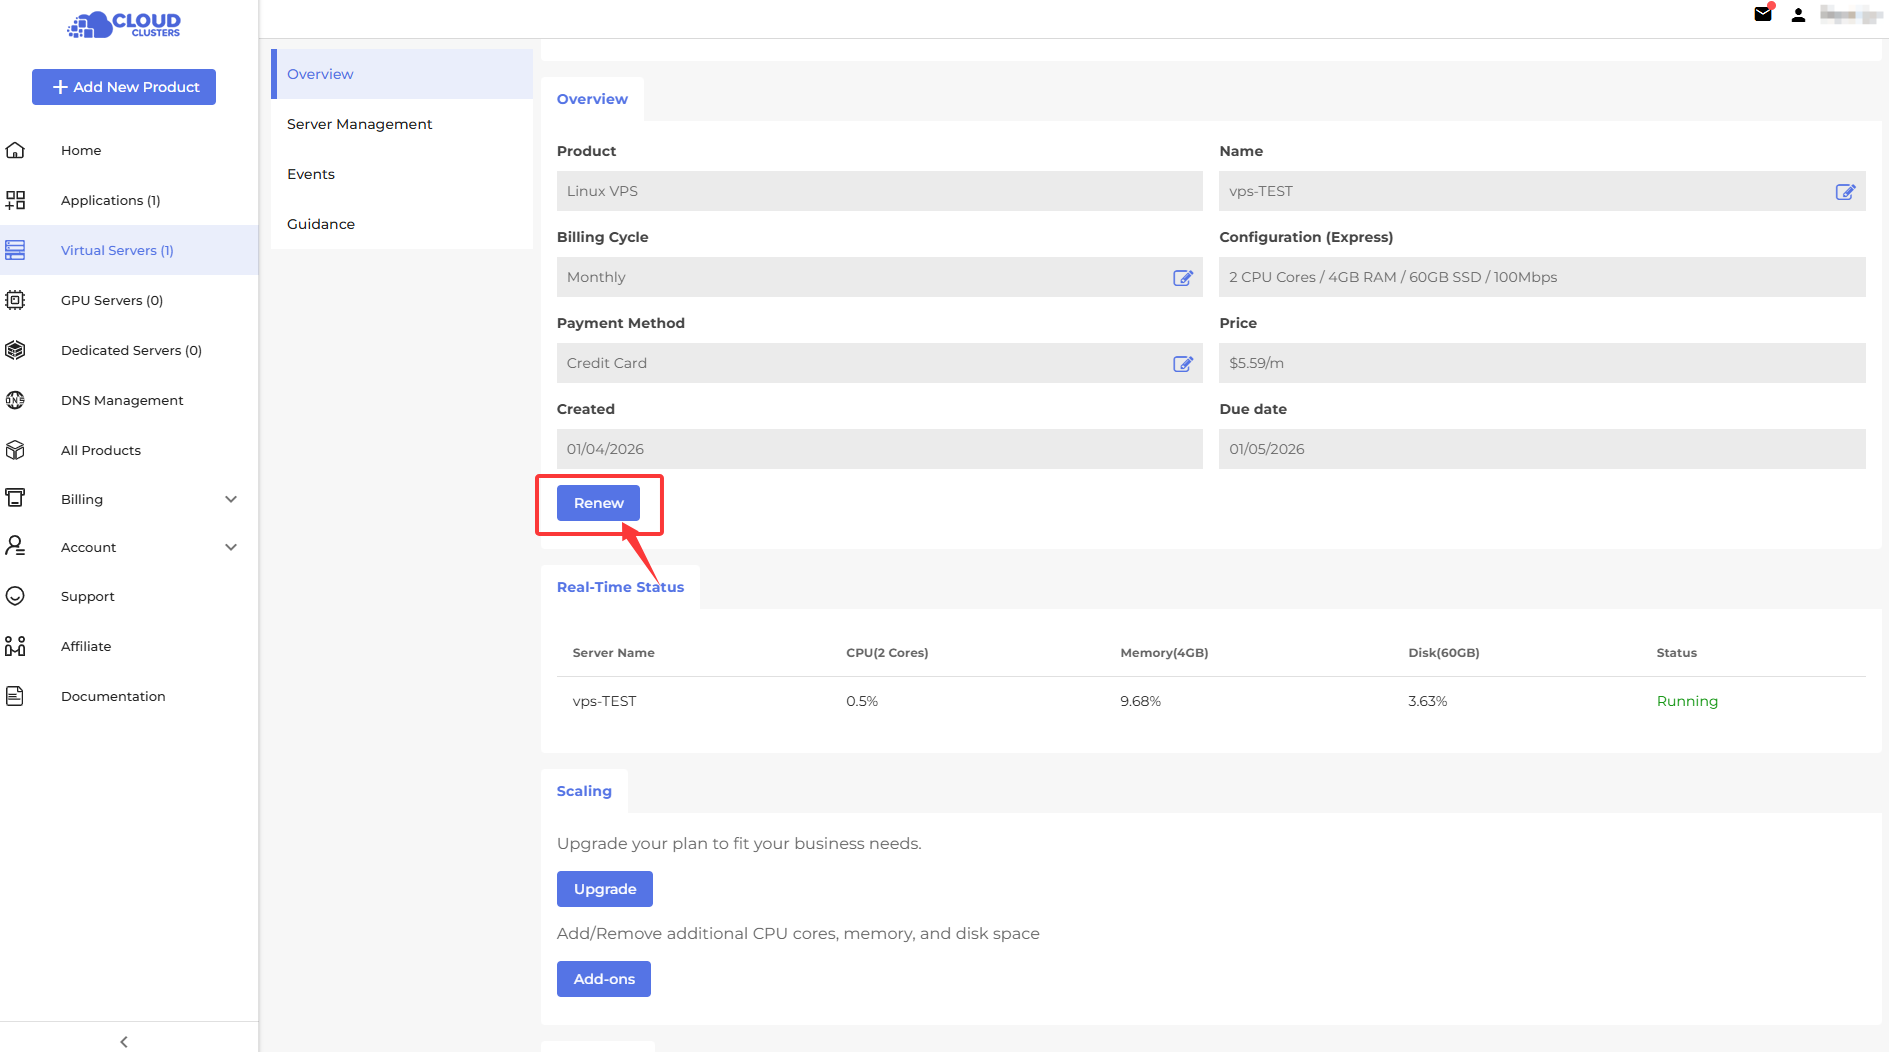
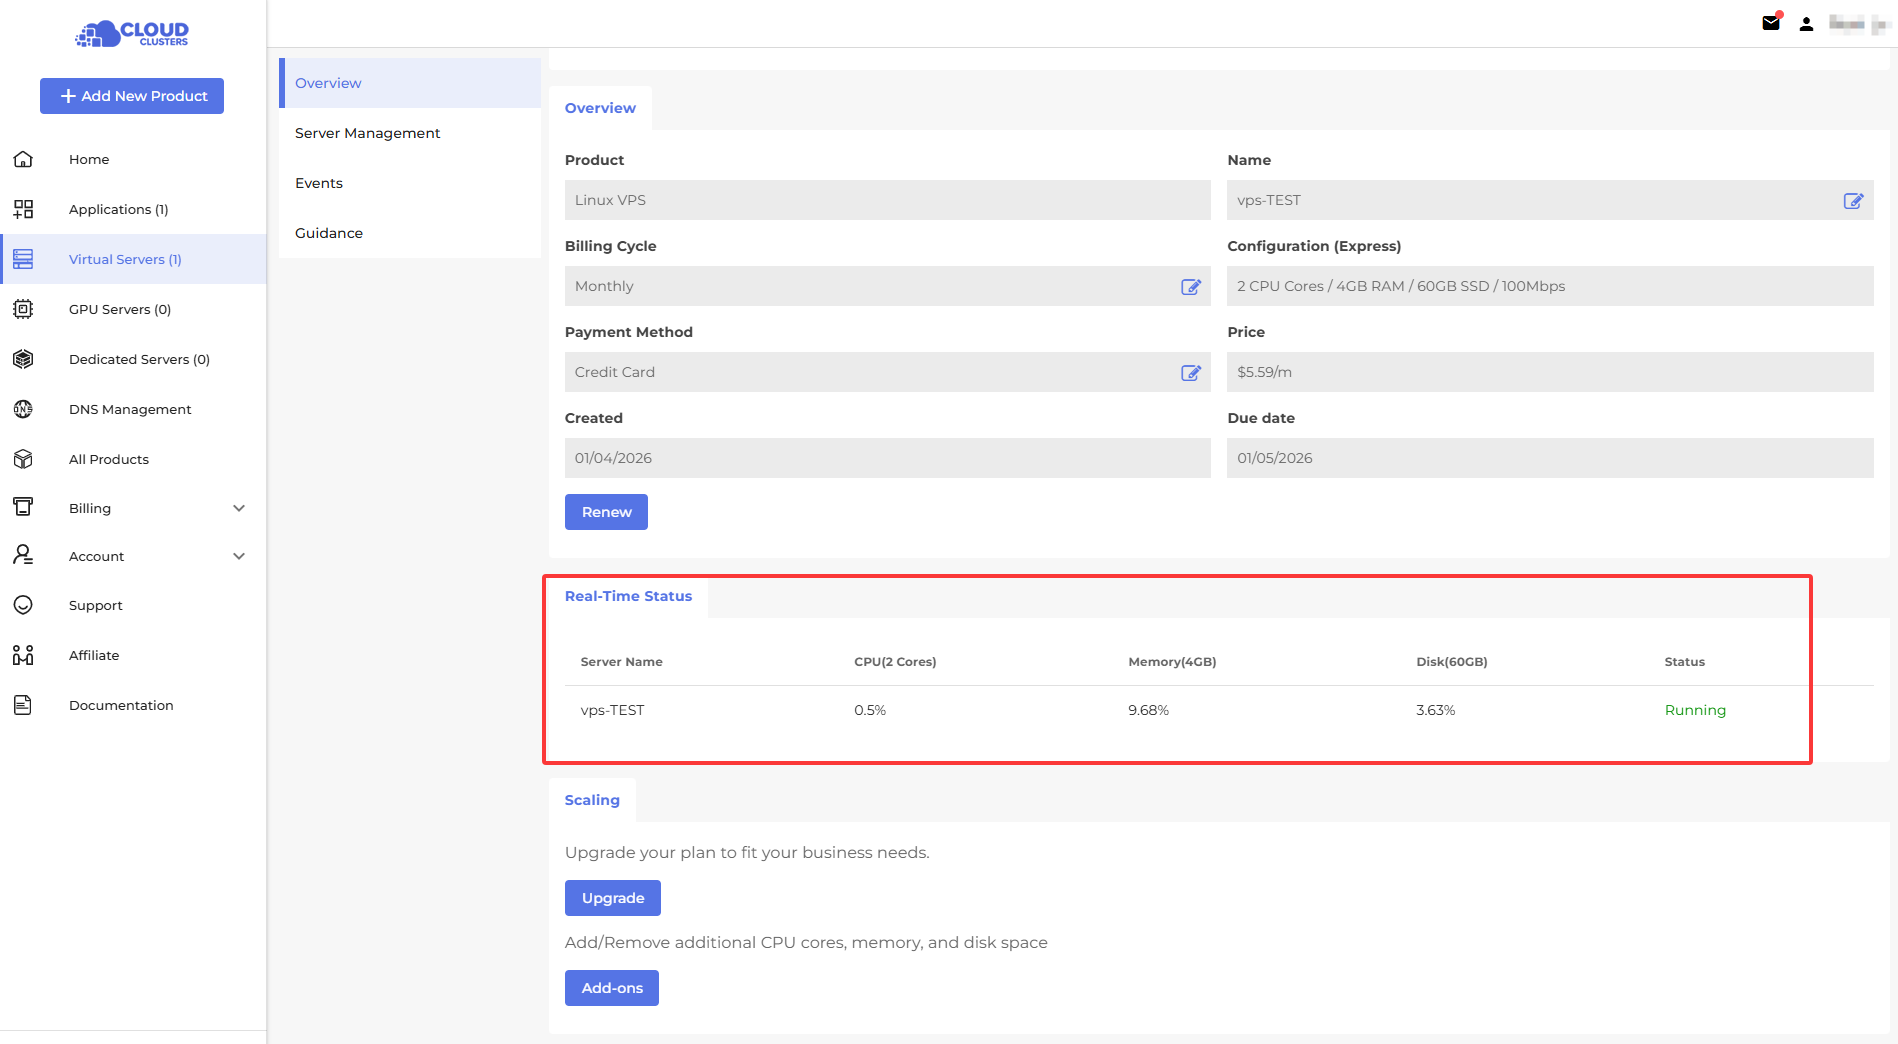
View Service Real-Time Status
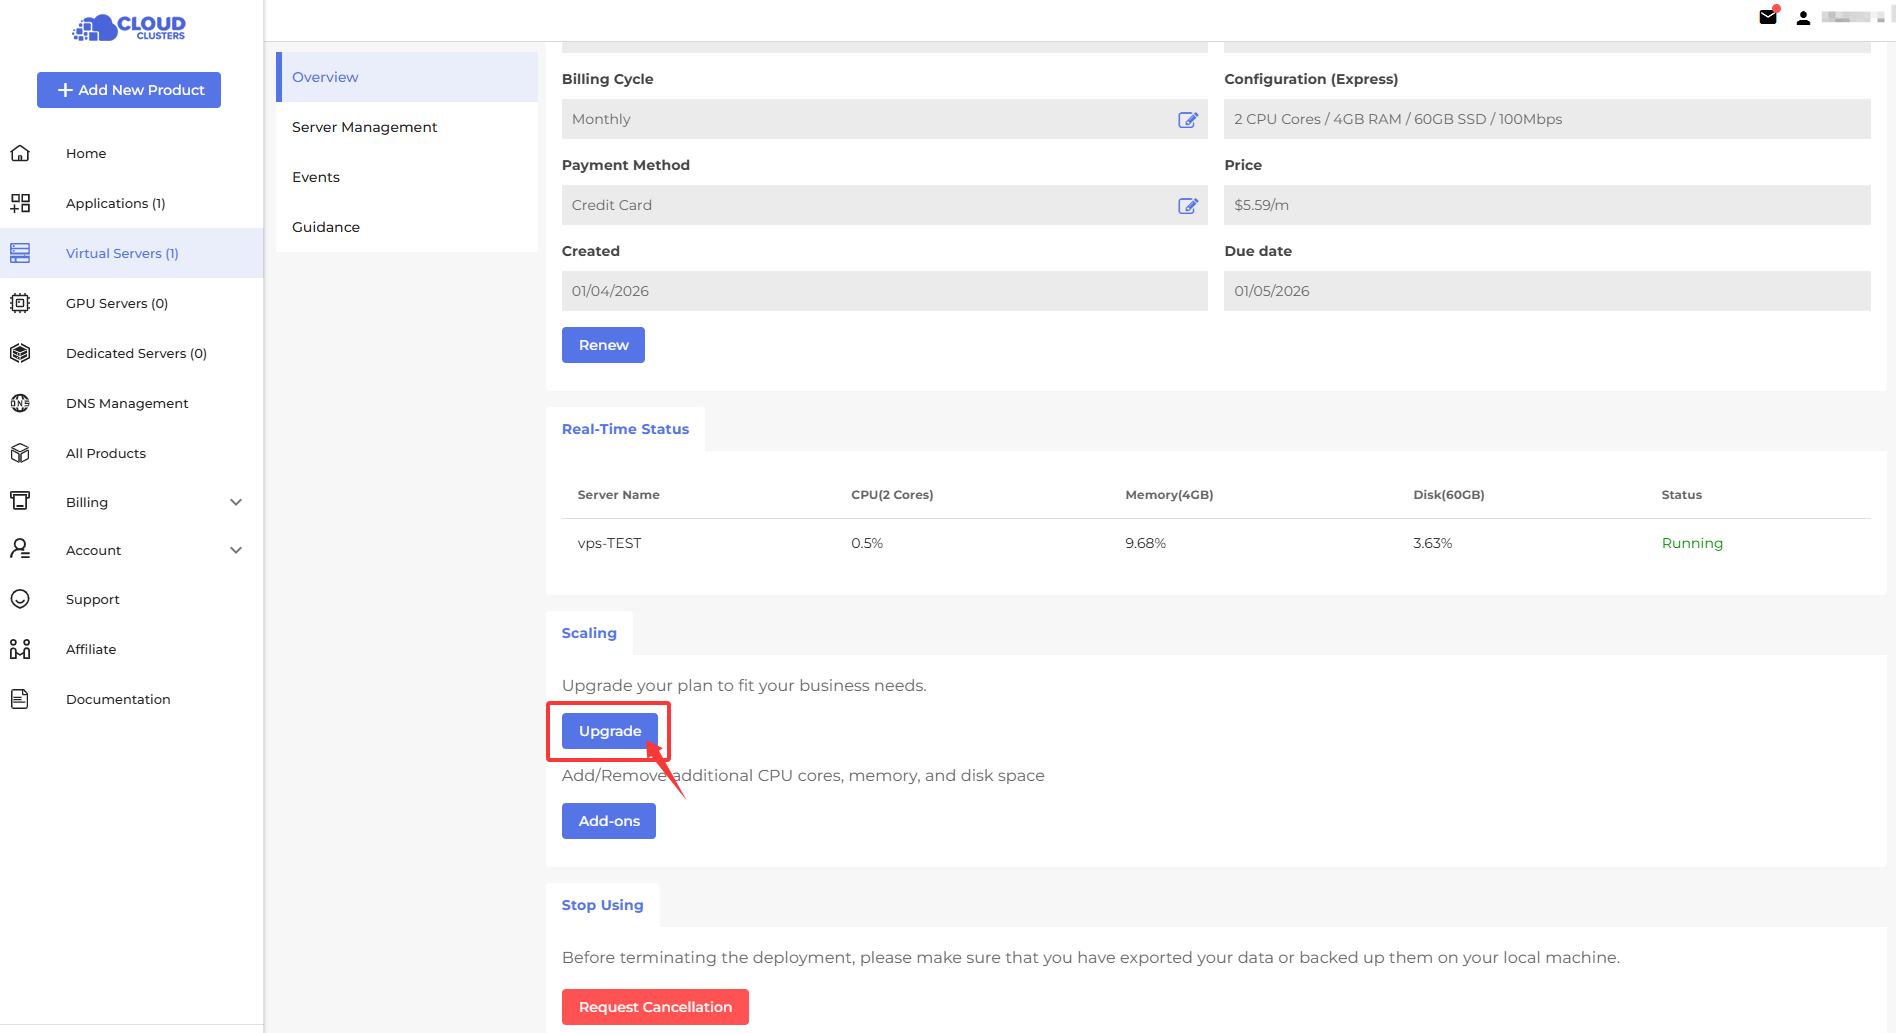
Upgrade (Only for VPS)
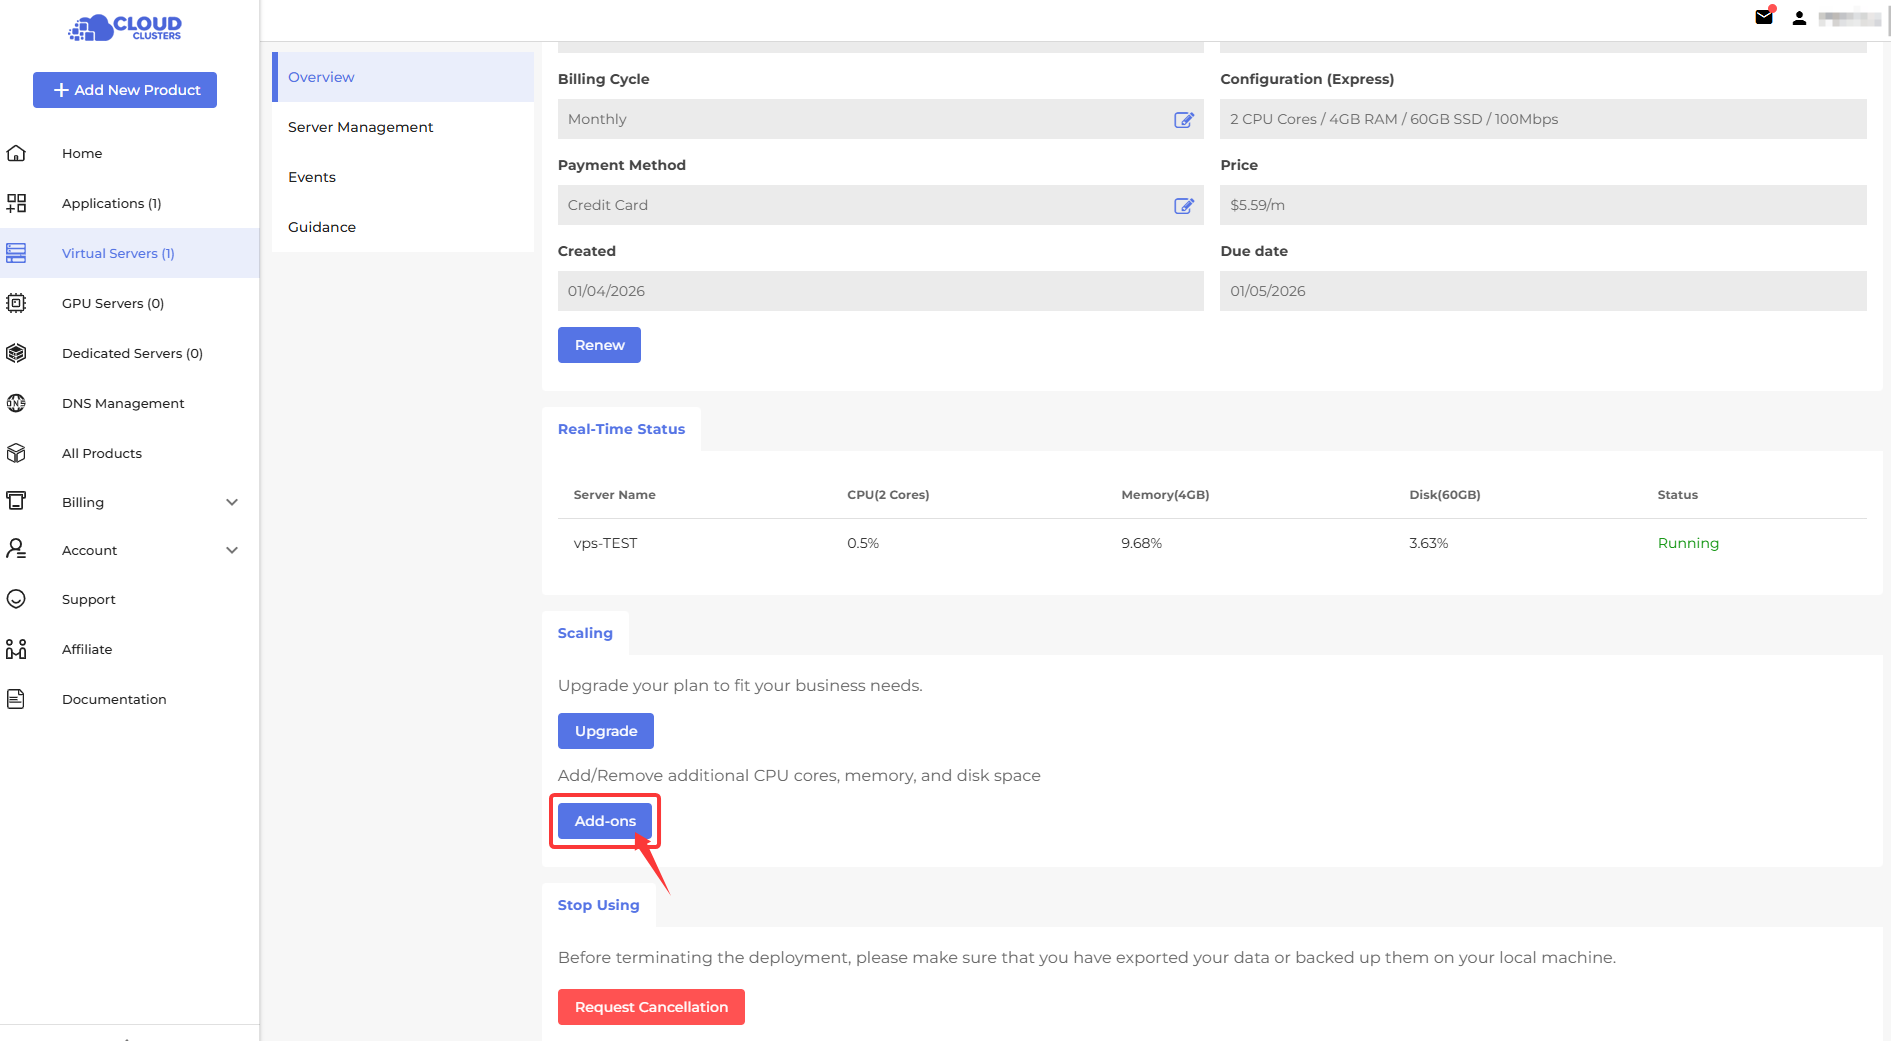
Request Addons
Cancel Service
Request Cancellation>Share Your Cancellayion Reason>Comfirm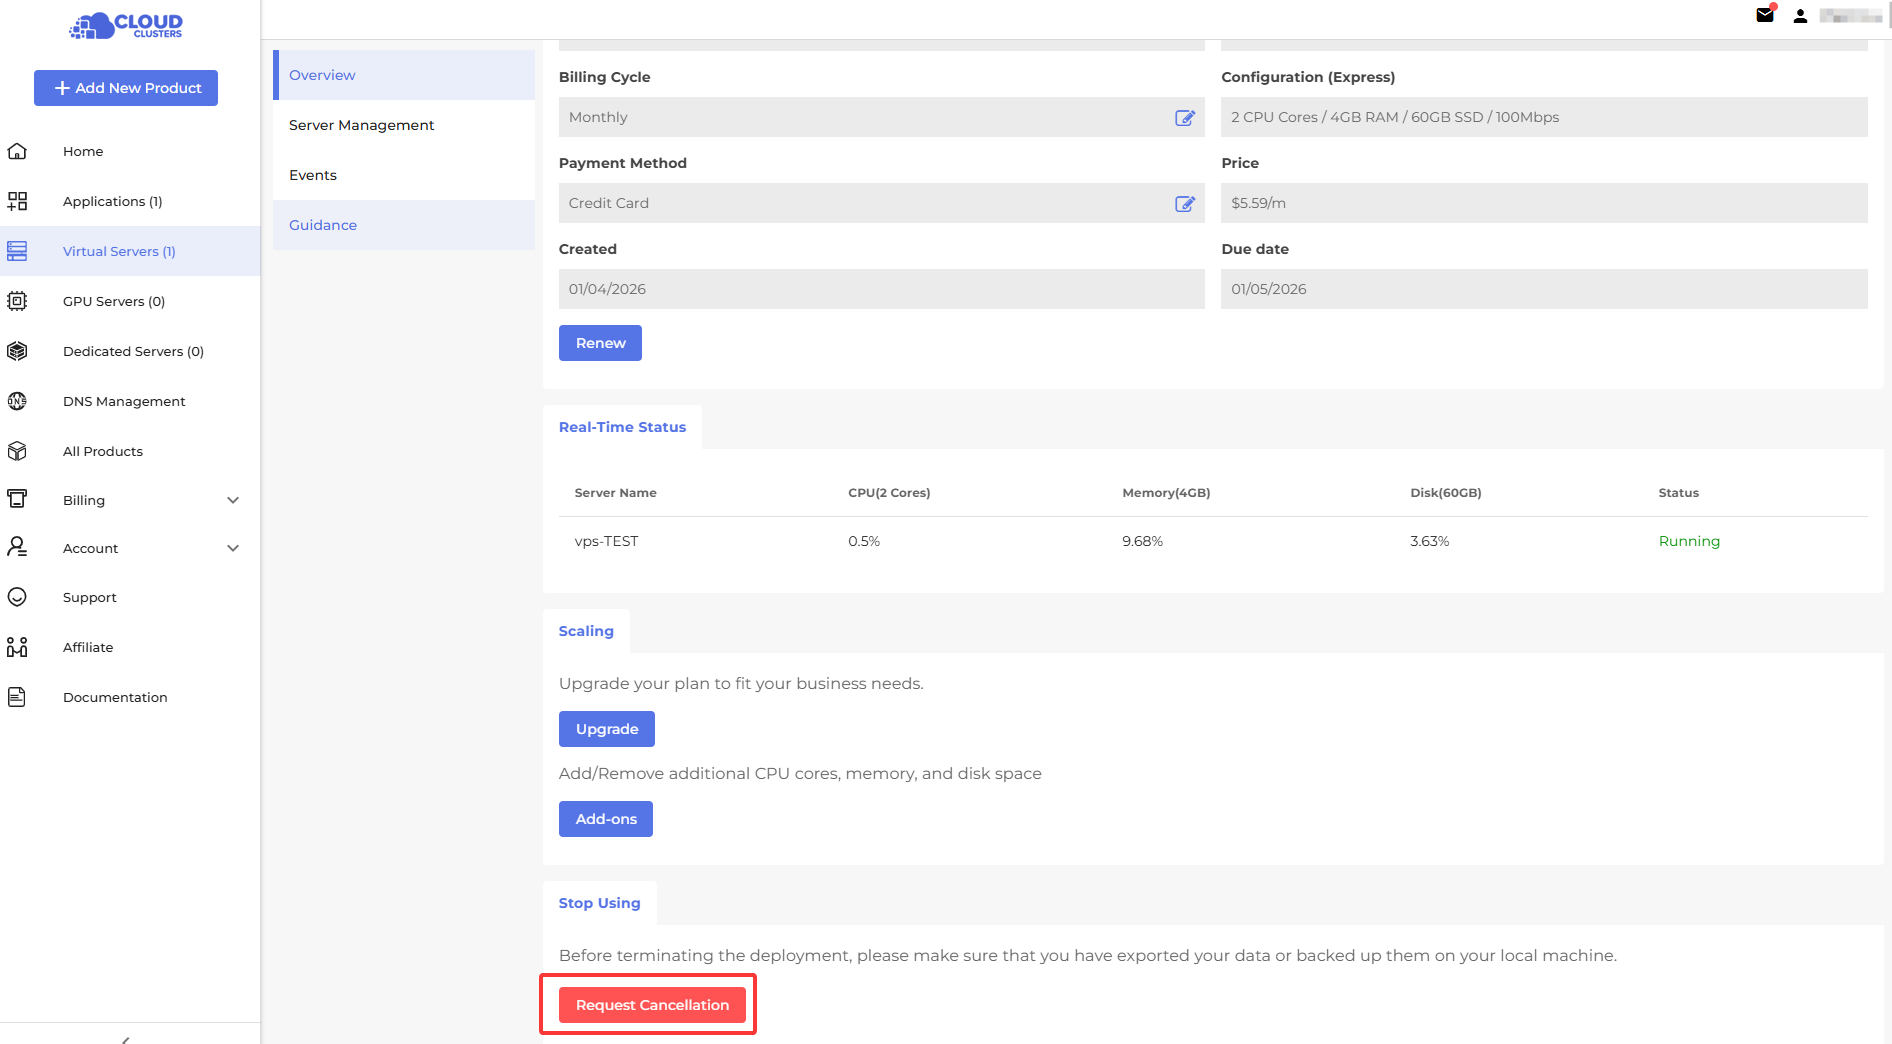
Reboot/Shut Down Service
If your server freezes or you can’t log in, you can use the reboot button to restart it.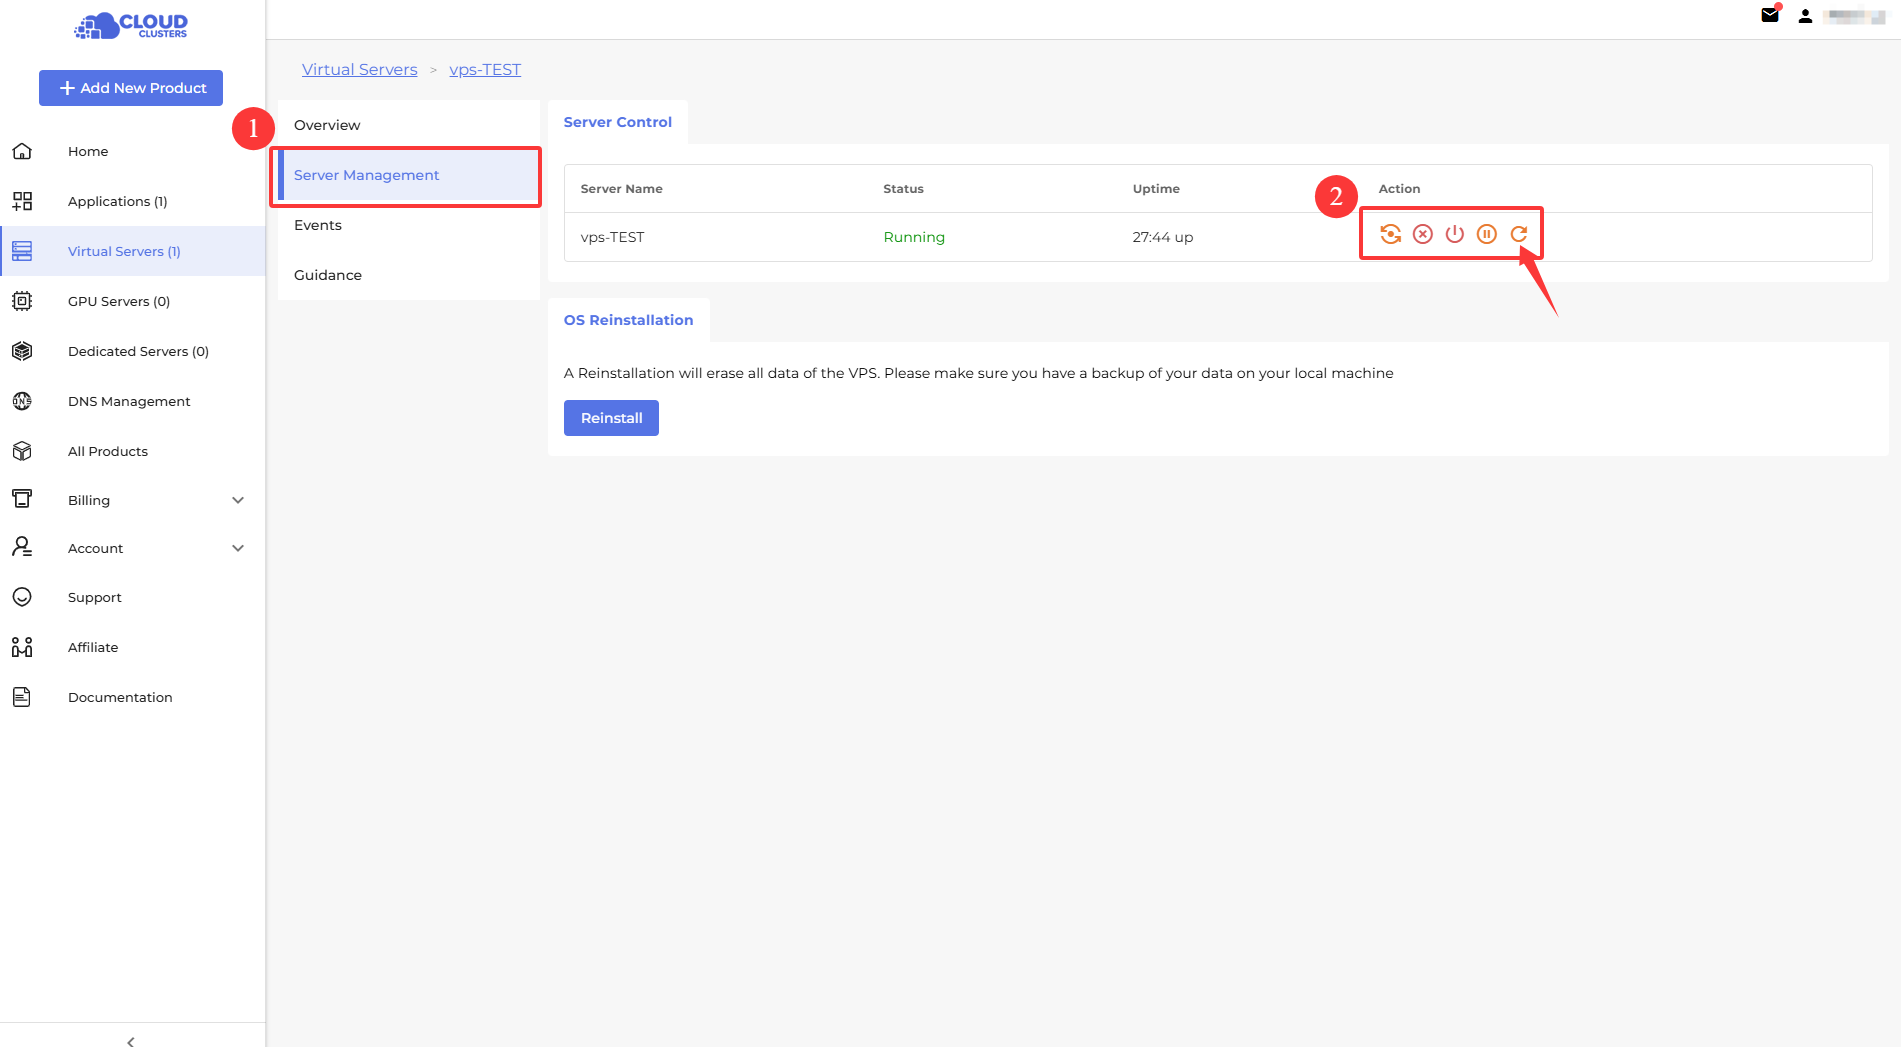
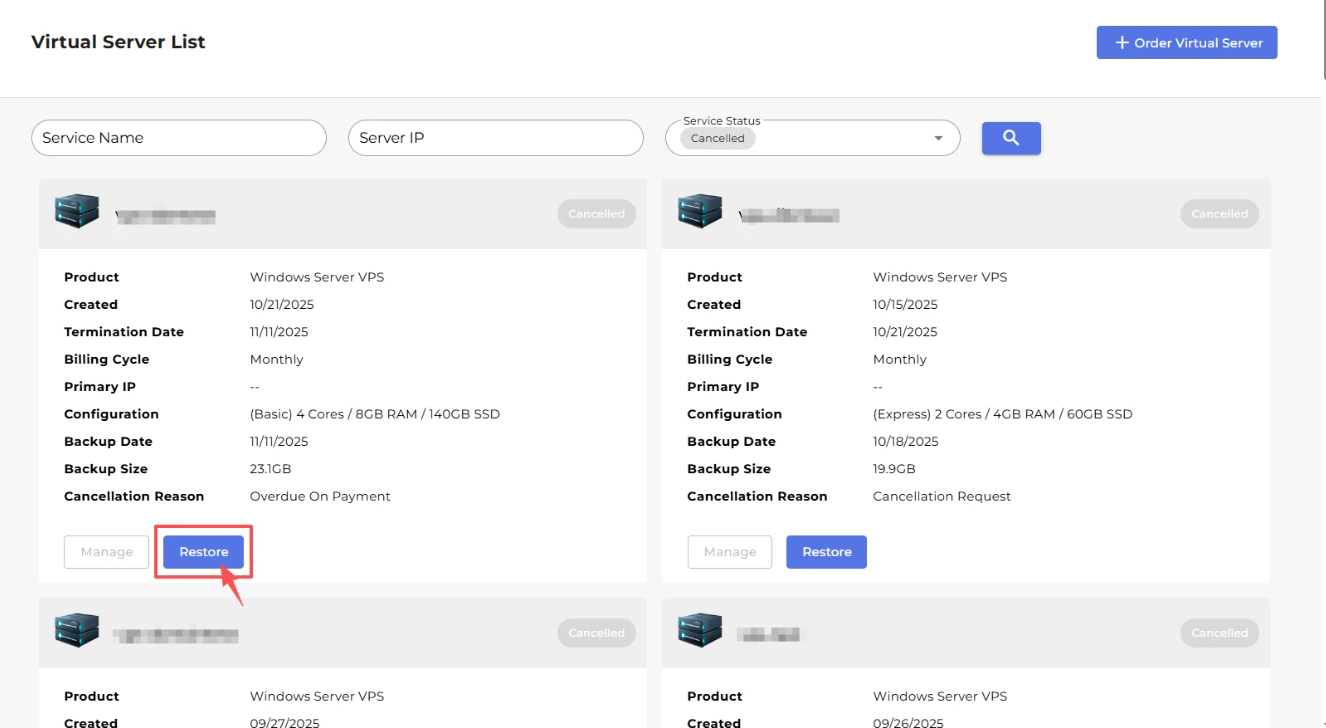
Service Restore(Only for VPS)
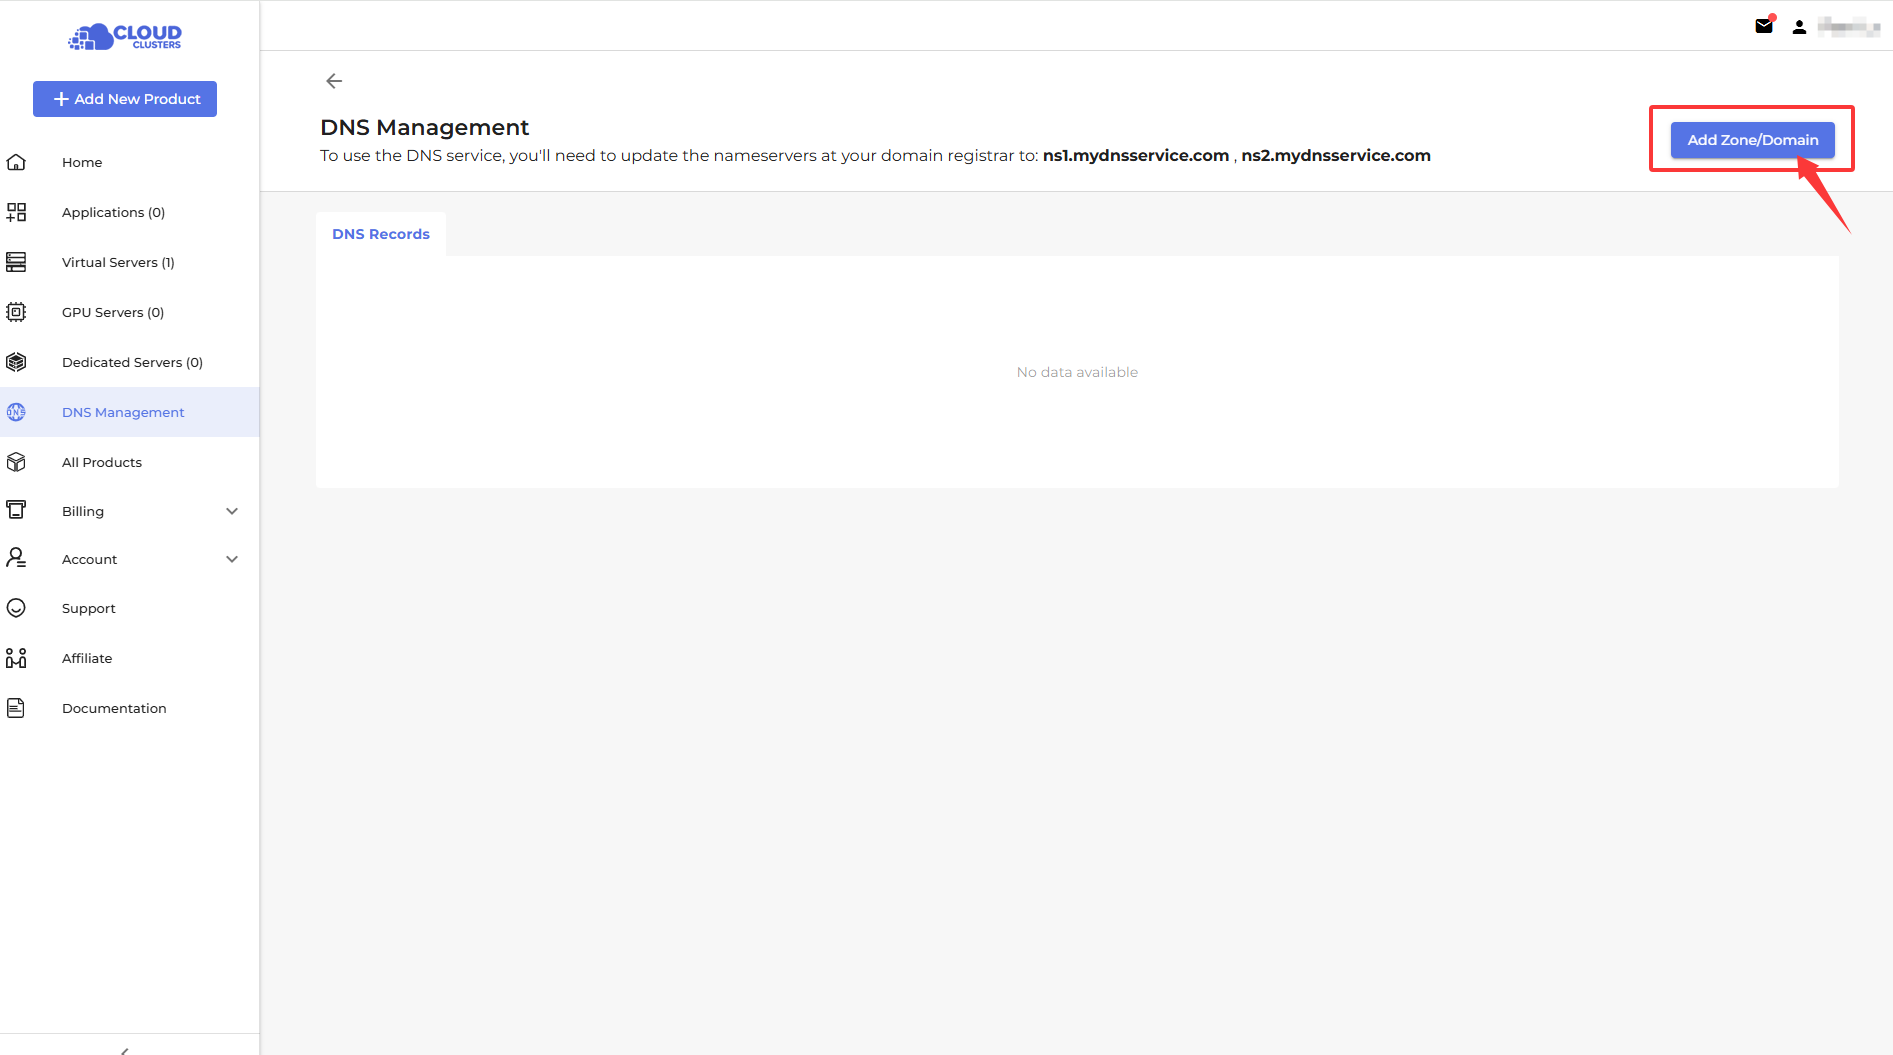
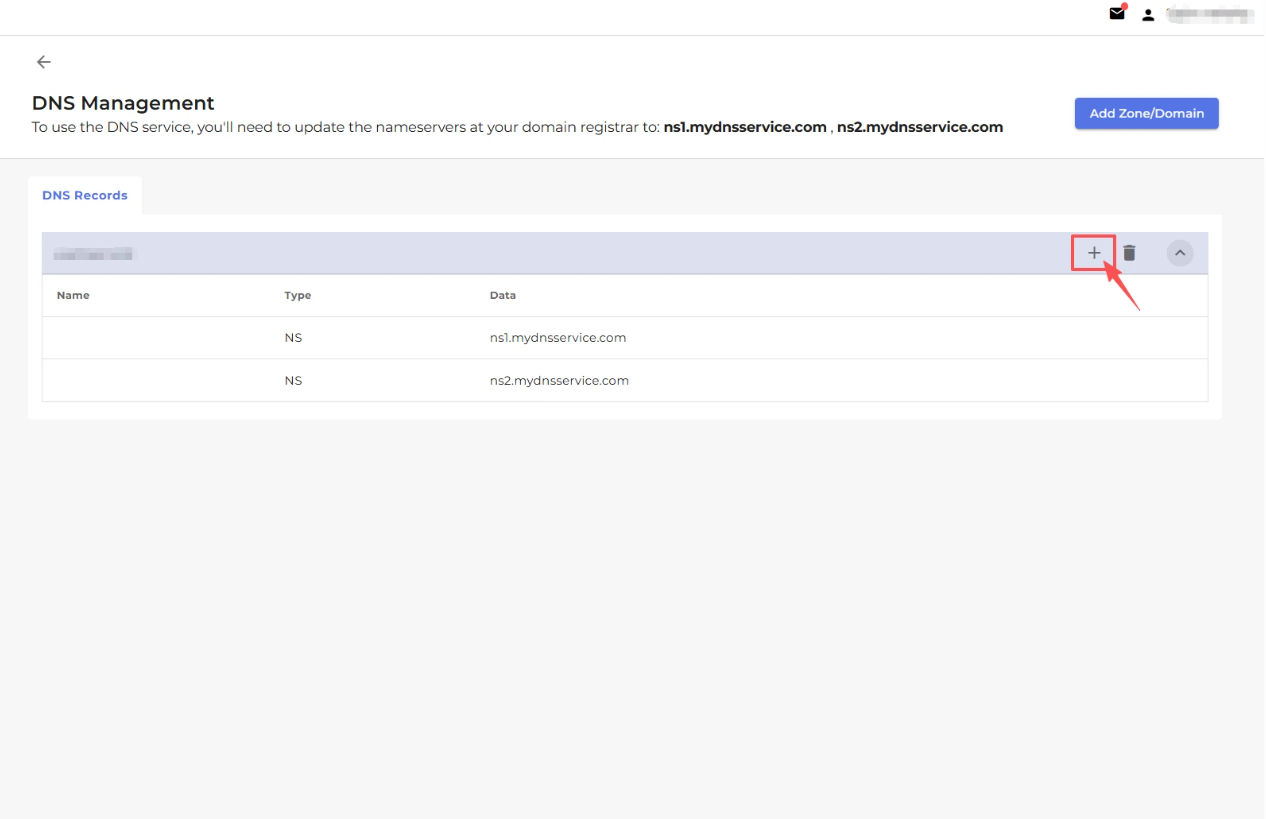
DNS Management
The DNS Management section helps you manage your domain name resolution settings, including adding new domains (Zones) and configuring specific DNS records.
Add Zone/Domain
Add new domains or zones to your account for DNS management:
- Step1: Click “Add Zone/Domain”.
- Step2: Enter the domain name, such as example.com.
- Step3: Click “Confirm” to complete the addition.
Add DNS Record
Add specific DNS records to a domain name to resolve it to a server or other service.
Supported record types:
- Step1: Select the domain zone where you want to add the record.
- Step2: Click "Add DNS Record. "
- Step3: Choose the record type (A, CNAME, MX, TXT, etc.).
- A Record: Points a domain name to an IPv4 address
- MX Record: Mail exchange record
- NS Record: Advanced configuration
- TXT Record: Used for verification or other custom information
- CNAME Record: Points a domain name to another domain name
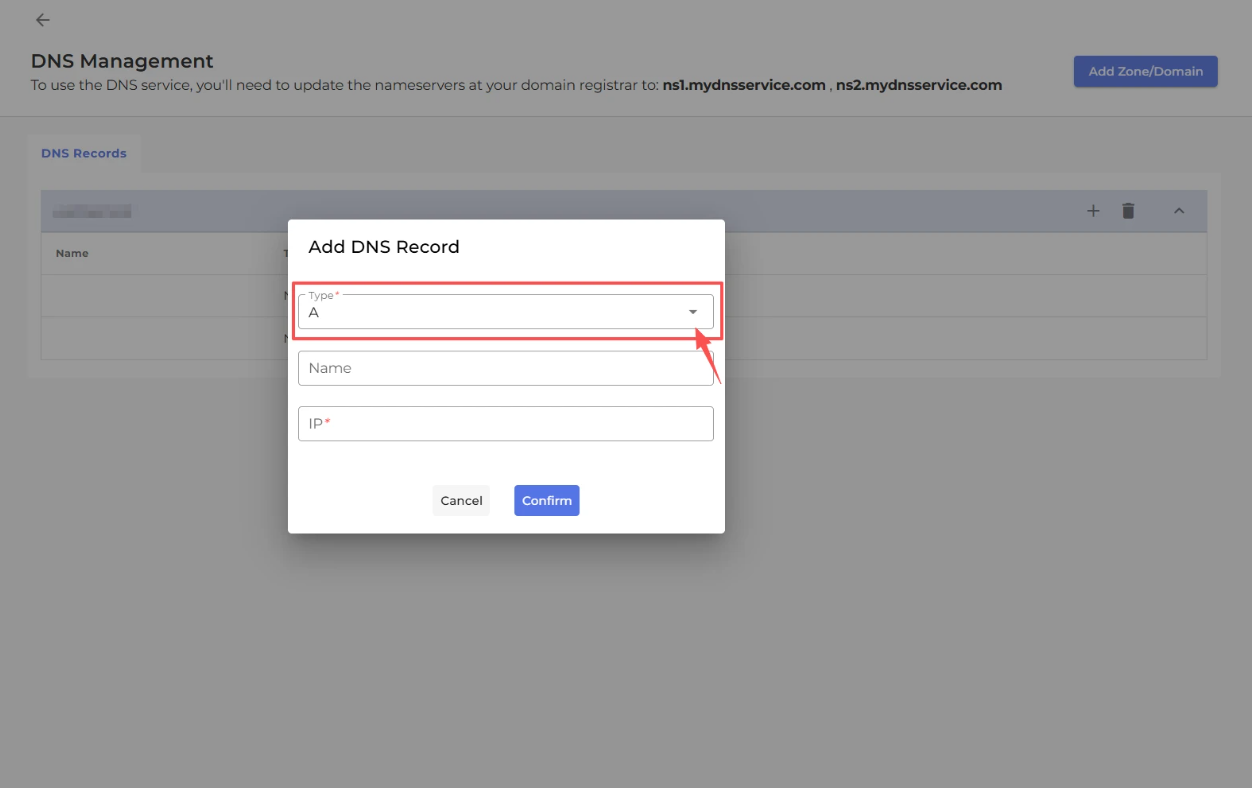
- Step4: Enter the record details, such as IP address, target domain, or priority.
- Step5: Click ”Confirm“ to save the record.
Note / Important Points:
- Ensure the IP address, domain name, or other record values are correct to avoid service interruptions.
- DNS changes may take 5–30 minutes to propagate globally due to caching.
- When adding subdomains, make sure the parent domain exists and is properly configured.
- Incorrect records can lead to inaccessible websites or services.
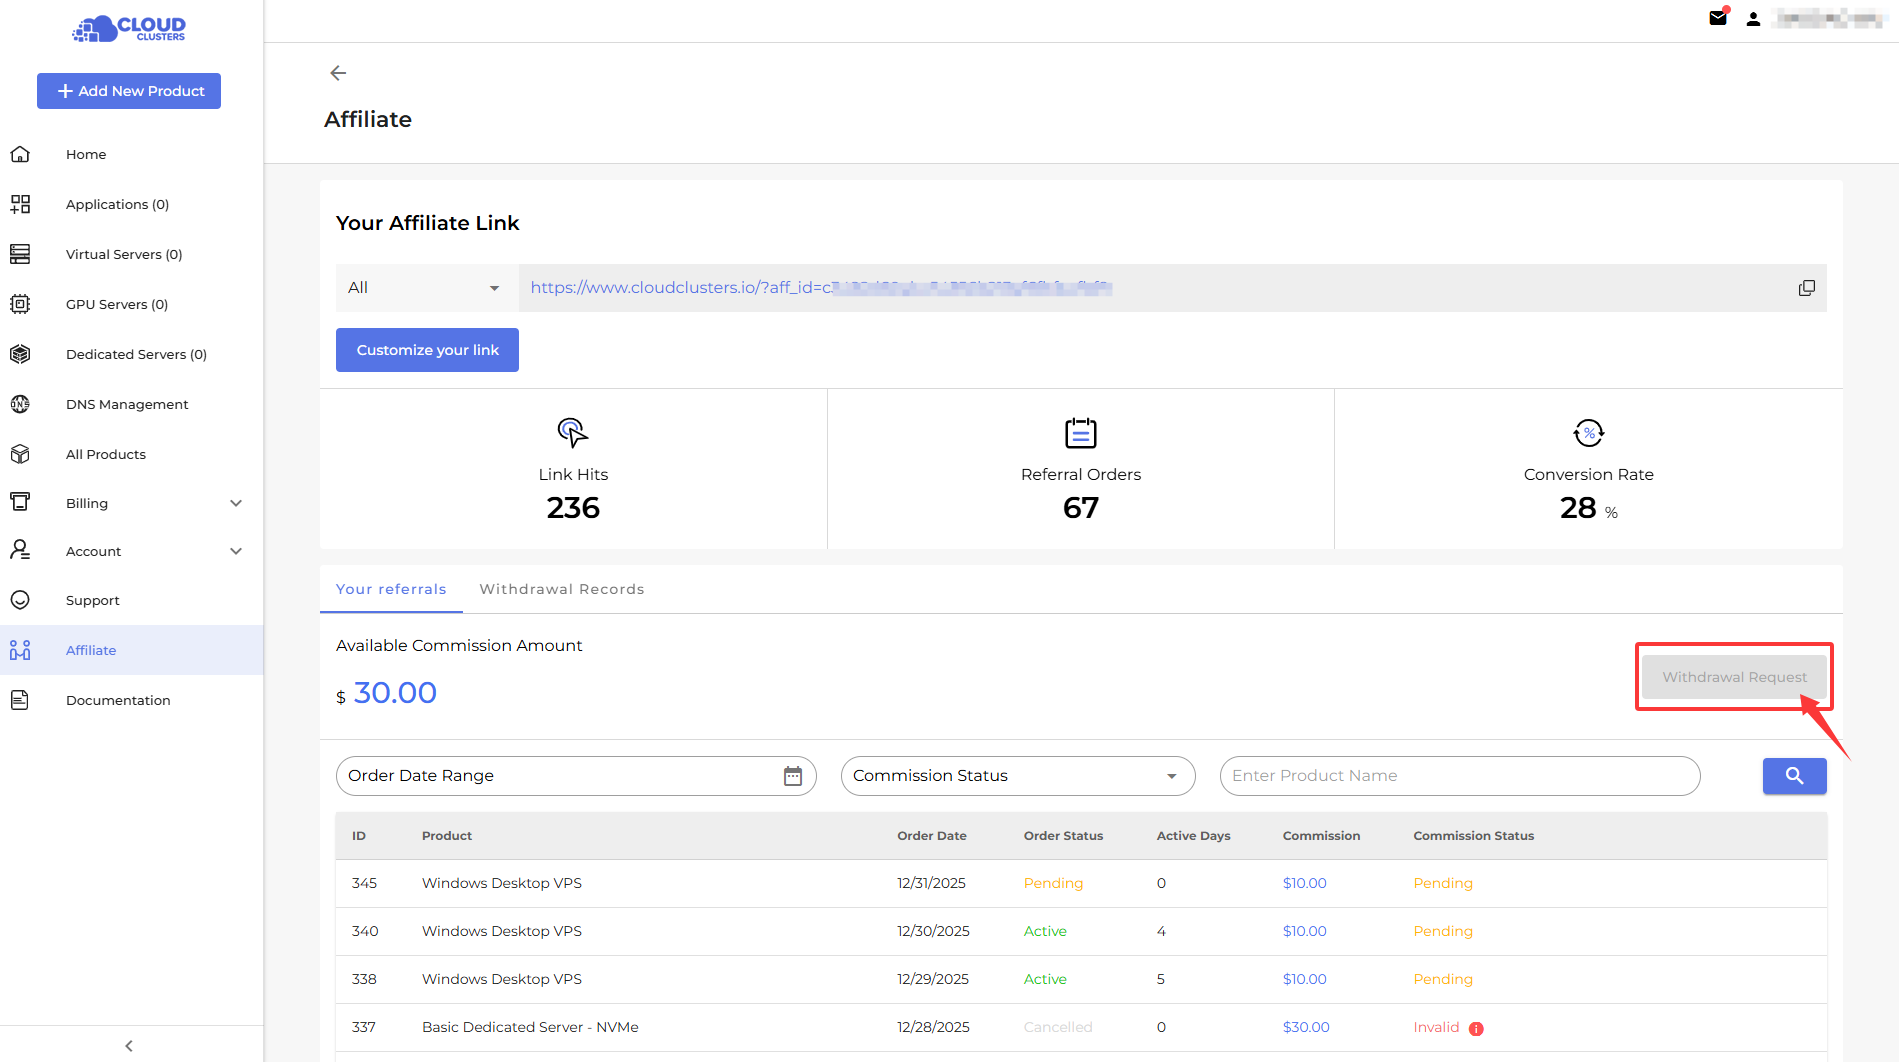
Affiliate Operations
The Affiliate Operations section lets you manage referrals, customize your affiliate links, and request withdrawals in one place.
Customize Your Affiliate Link
You can create and customize your affiliate link to share with others and track referrals.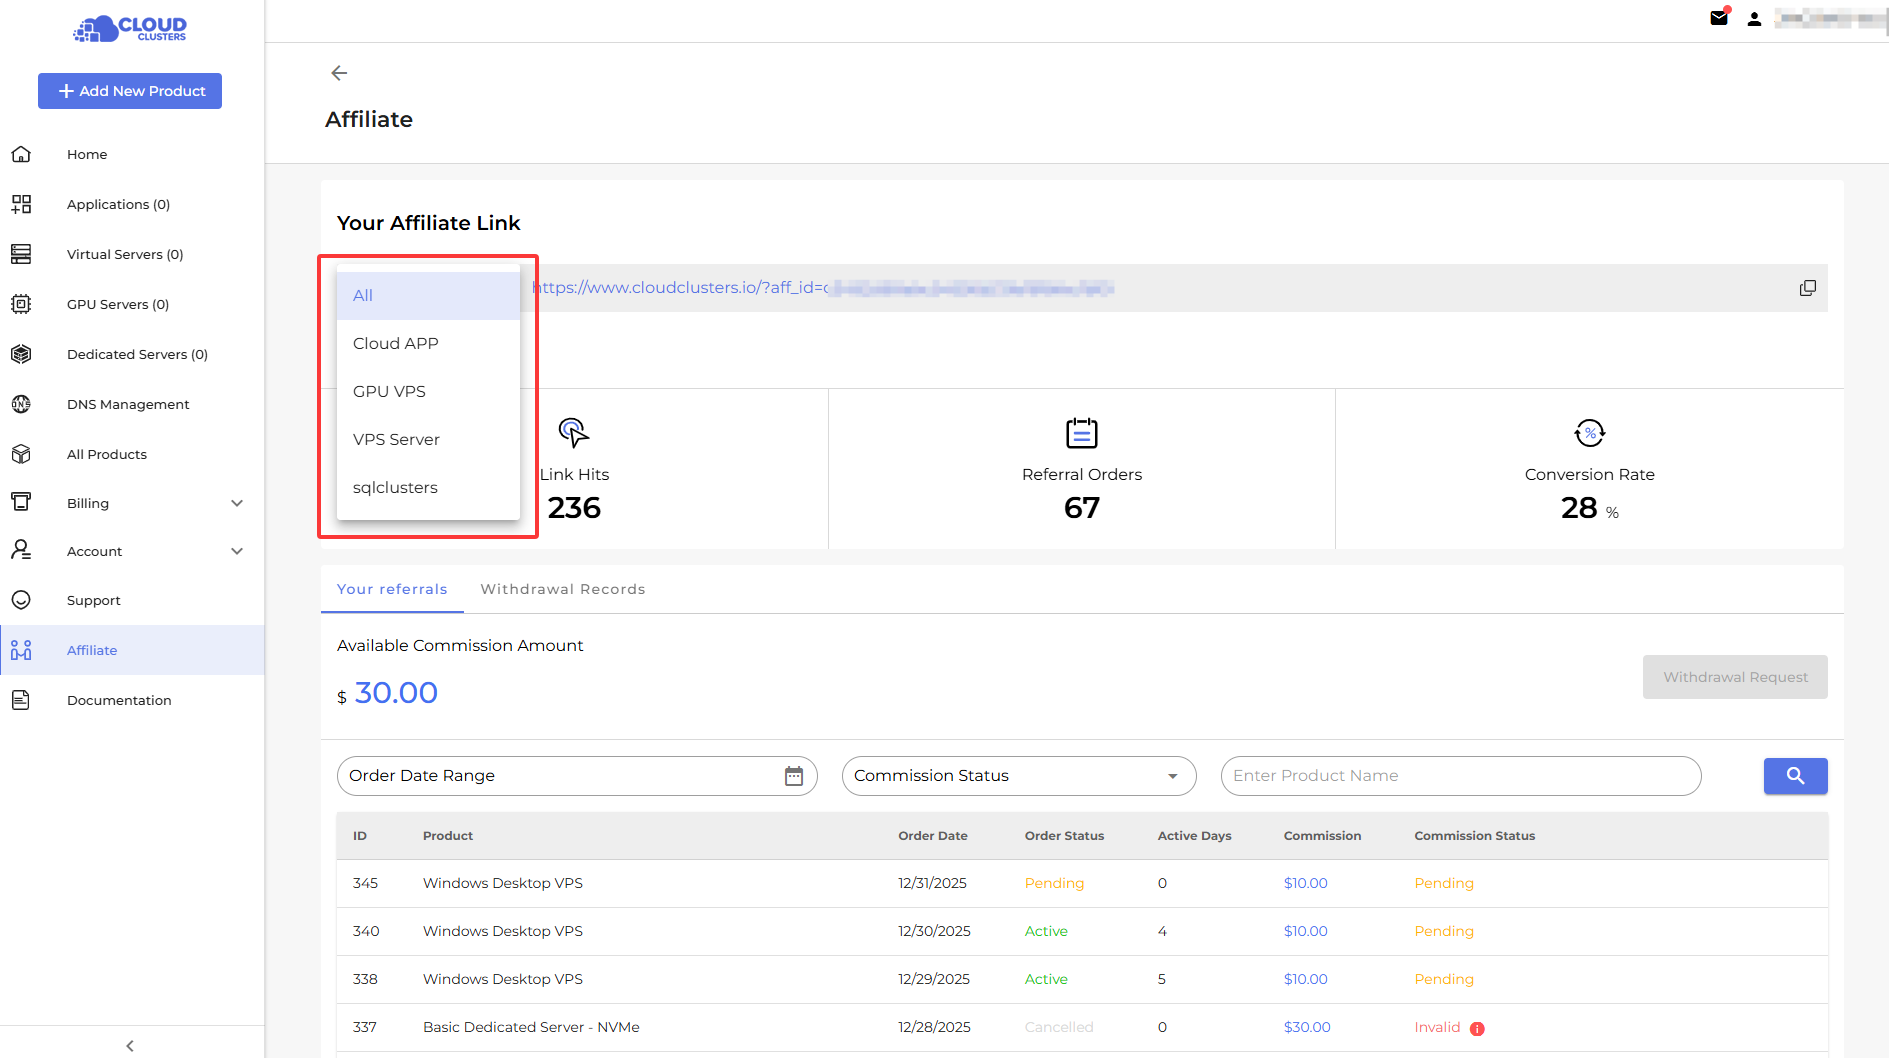
Withdrawal Request
Submit a request to withdraw your affiliate earnings to your preferred payment method.