
How to Publish a Web Service on a Shared IP Linux VPS
Overview
This guide explains how to publish web services on a Shared IP Linux VPS provided by Cloud Clusters.
By default, Shared IP VPS instances do not have a dedicated public IP address. Instead, multiple VPS instances share the same public IP, and external access is handled through the platform’s unified gateway. Because of this architecture, services running inside your VPS cannot be accessed directly from the public internet. To make them accessible, you must configure domain mapping in the Cloud Clusters's control panel.
When a request reaches the platform gateway, it is routed to your VPS service through the following path:
Public Domain → Control Panel Mapping → VPS Internal IP:Port
This routing mechanism allows external users to access applications running inside your VPS through a domain name.
Due to the shared IP architecture, applications that require a dedicated public IP to function properly (such as cPanel or CloudPanel) are not supported on Shared IP instances. If you need to run these applications, we recommend using a Dedicated IP VPS instead.
For standard websites, HTTPS access can still be enabled through the Cloud Clusters control panel. The platform provides a unified HTTPS entry point, allowing users to securely access services through their domain names.
How Does Website Management Work?

Step-by-Step Setup
Step 1: Start the Web Service Inside the VPS
Make sure your web service is running and listening on: 0.0.0.0:PORT or Internal_IP:PORT. Do not bind the service to: 127.0.0.1 or localhost. Otherwise, the service will not be reachable from outside the VPS.
Step 2: Add a Domain Mapping in the Control Panel
In the customer control panel, create a domain mapping by providing the domain name, IP, and port. If your own domain is not ready or you want to test the service first, you can enable the temporary URL option when creating the mapping. The system will automatically generate a temporary testing domain.
Step 3: Configure DNS Records
If you are using your own domain, create an A record that points your domain to the public IP provided by Cloud Clusters. If you are using the temporary domain generated by the system, DNS configuration is not required.
Step 4: Configure SSL (Optional)
To make your website more secure, you can enable HTTPS by configuring an SSL certificate. You can install SSL certificates directly in the Cloud Clusters control panel. Once SSL is enabled, visitors will be able to access your website securely using HTTPS.
Typical Usage Scenarios
Scenario 1: One Website on the VPS Listening on One Port
Example configuration:
- VPS IP: 192.168.x.x
- Port: 80
- Domain: example.com
Control panel mapping: example.com → 192.168.x.x:80
In this case:
- No domain binding is required inside the VPS
- No SSL certificate deployment is required inside the VPS
Control Panel Configuration Steps
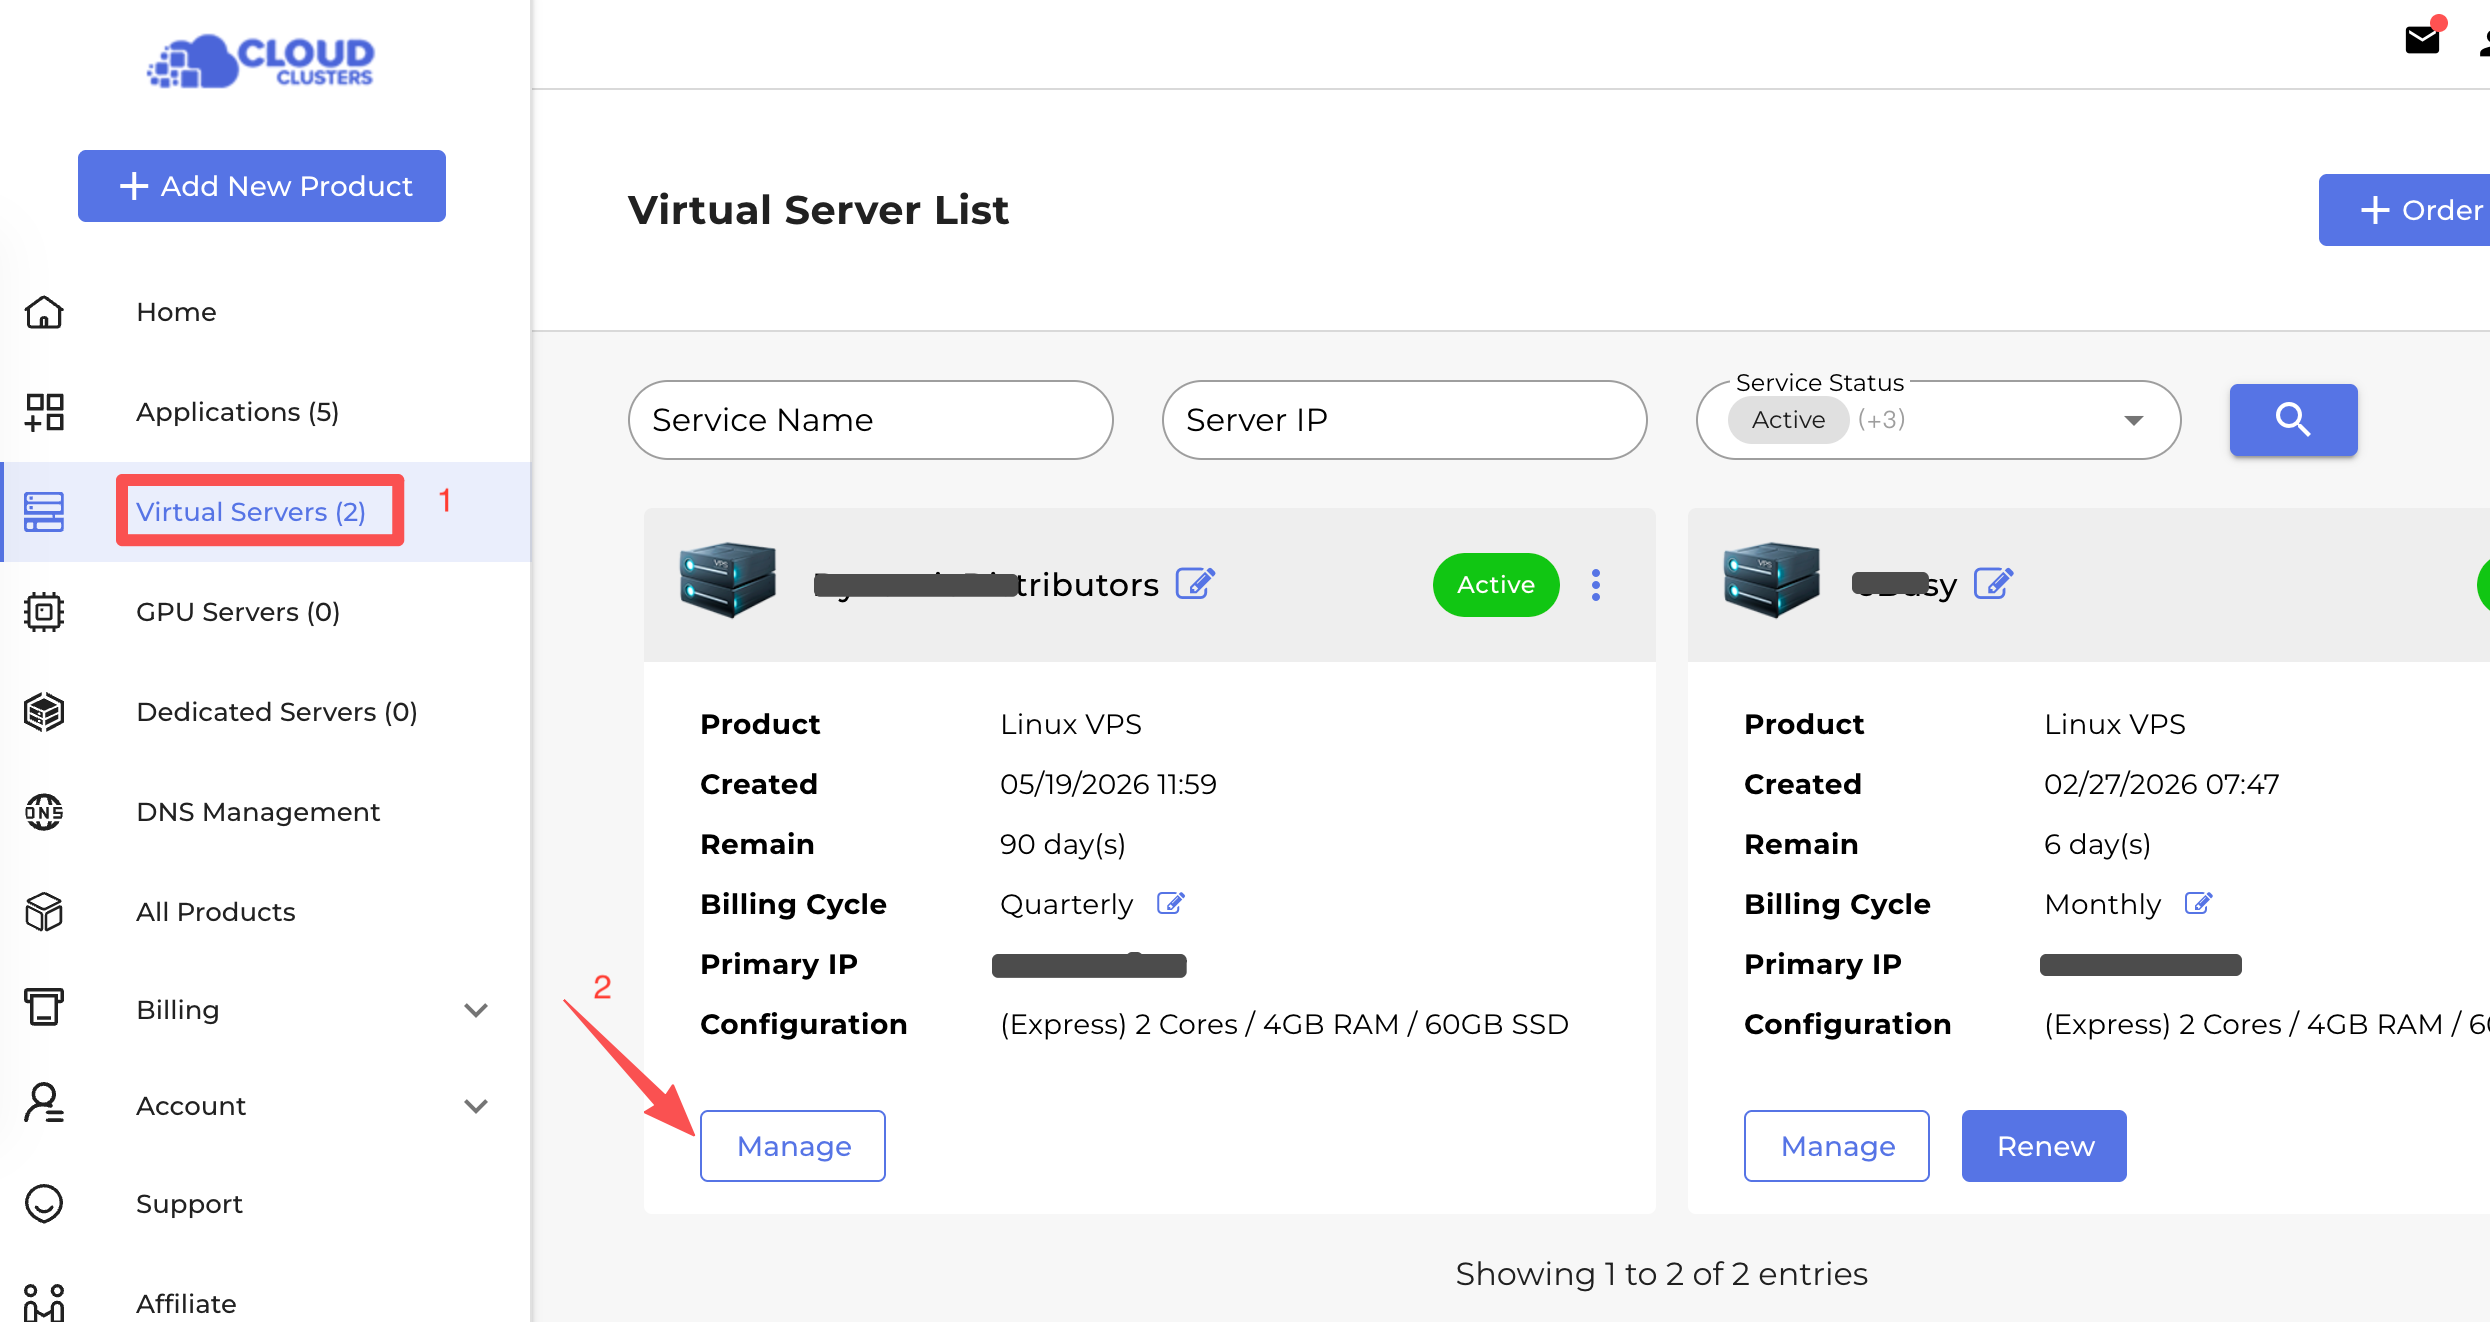
- Go to Control Panel, and select the "Virtual Servers" button. Click the "Manage" button to go to your VPS Details page in the control panel.
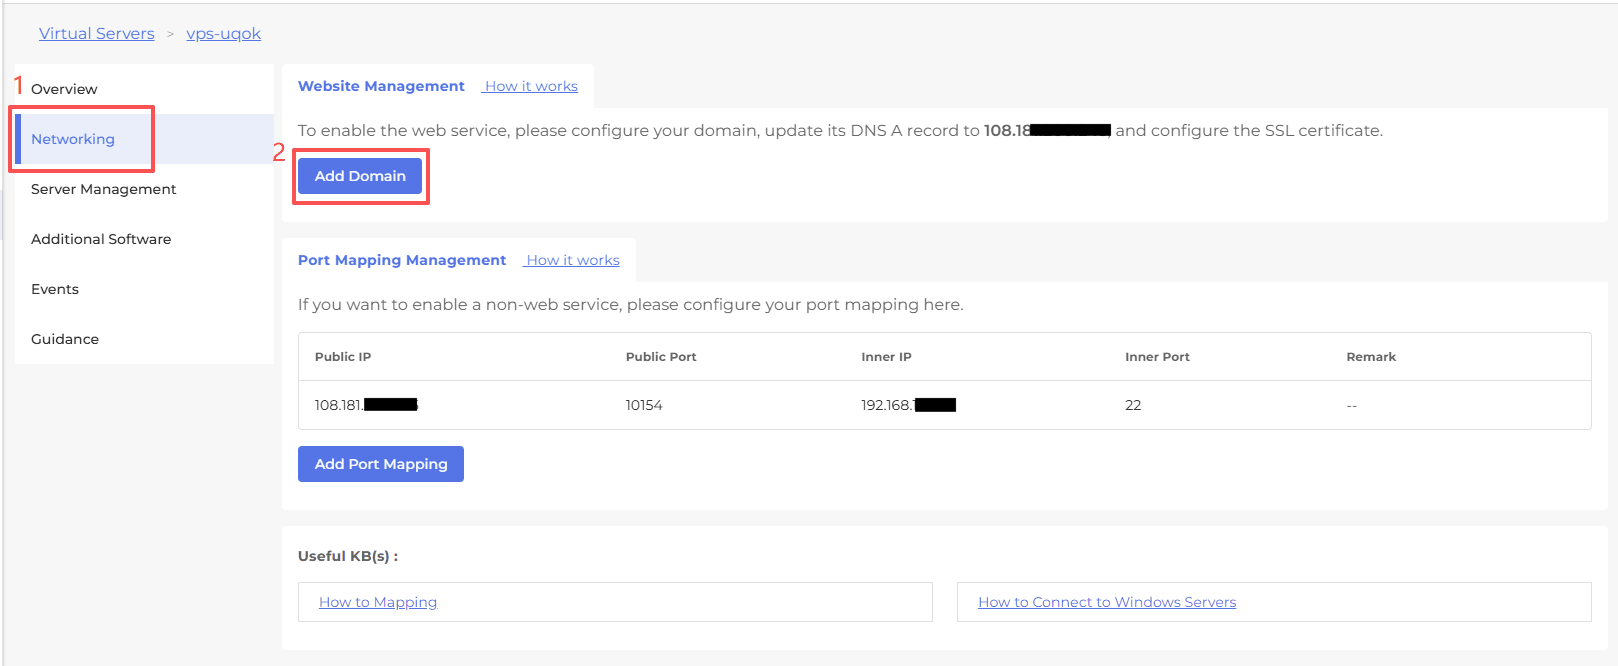
- Click Networking, and then click Add Domain.
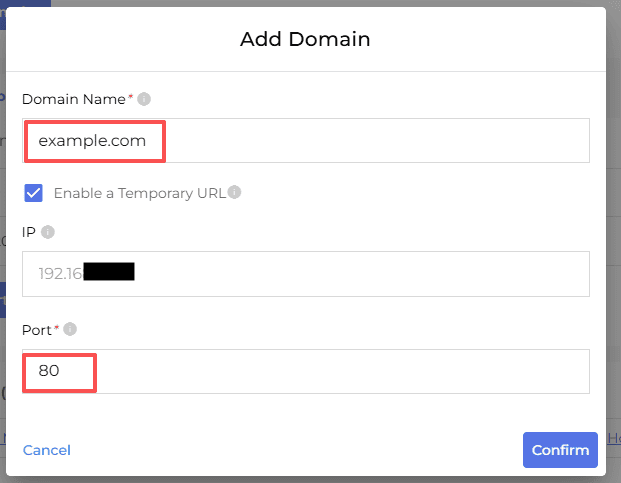
In the pop-up window:
- Enter your domain name in Domain Name.
- If you do not have a domain yet, you may enter a placeholder domain and enable Enable a Temporary URL. The system will generate a temporary testing domain.
- Enter the listening port (for example
80) in Port. - Click Confirm.
- Configure DNS Records
After the mapping is created, simply point your domain DNS to the public IP shown in the panel. You will then be able to access your website through the domain.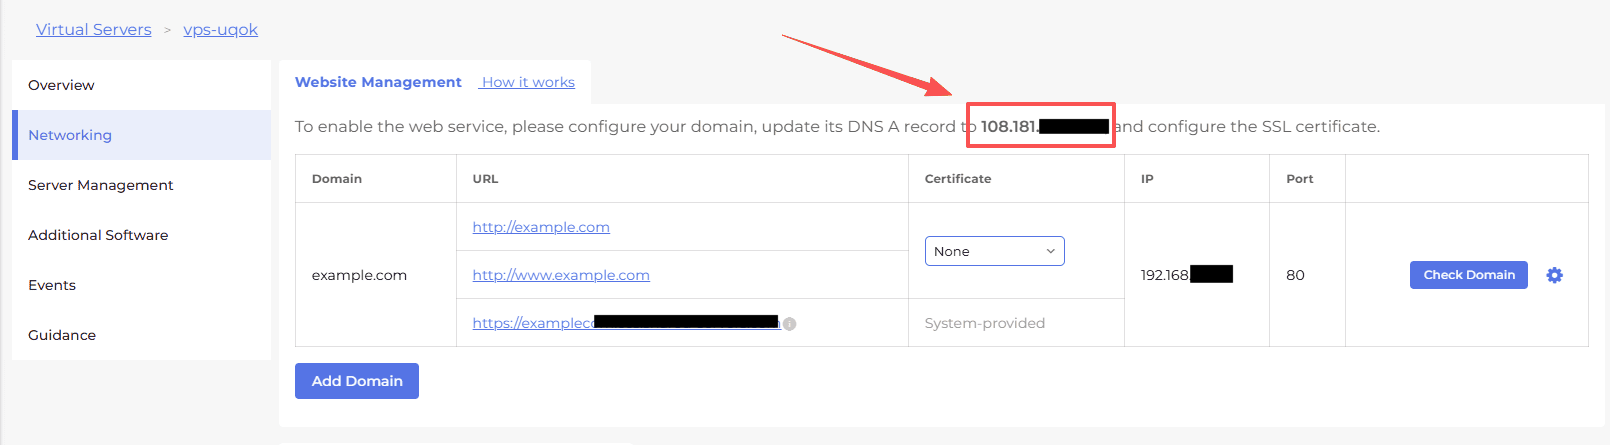
- Enable HTTPS (Optional)
To make your website more secure, you can enable HTTPS by installing an SSL certificate in the control panel. After the domain mapping is created, go to the Website Management page and click the box below Certificate. You will see two options:
- Enable Free SSL
Click this option to automatically install a free SSL certificate provided by the platform. - Install Customer Cert
Click this option if you want to upload your own SSL certificate.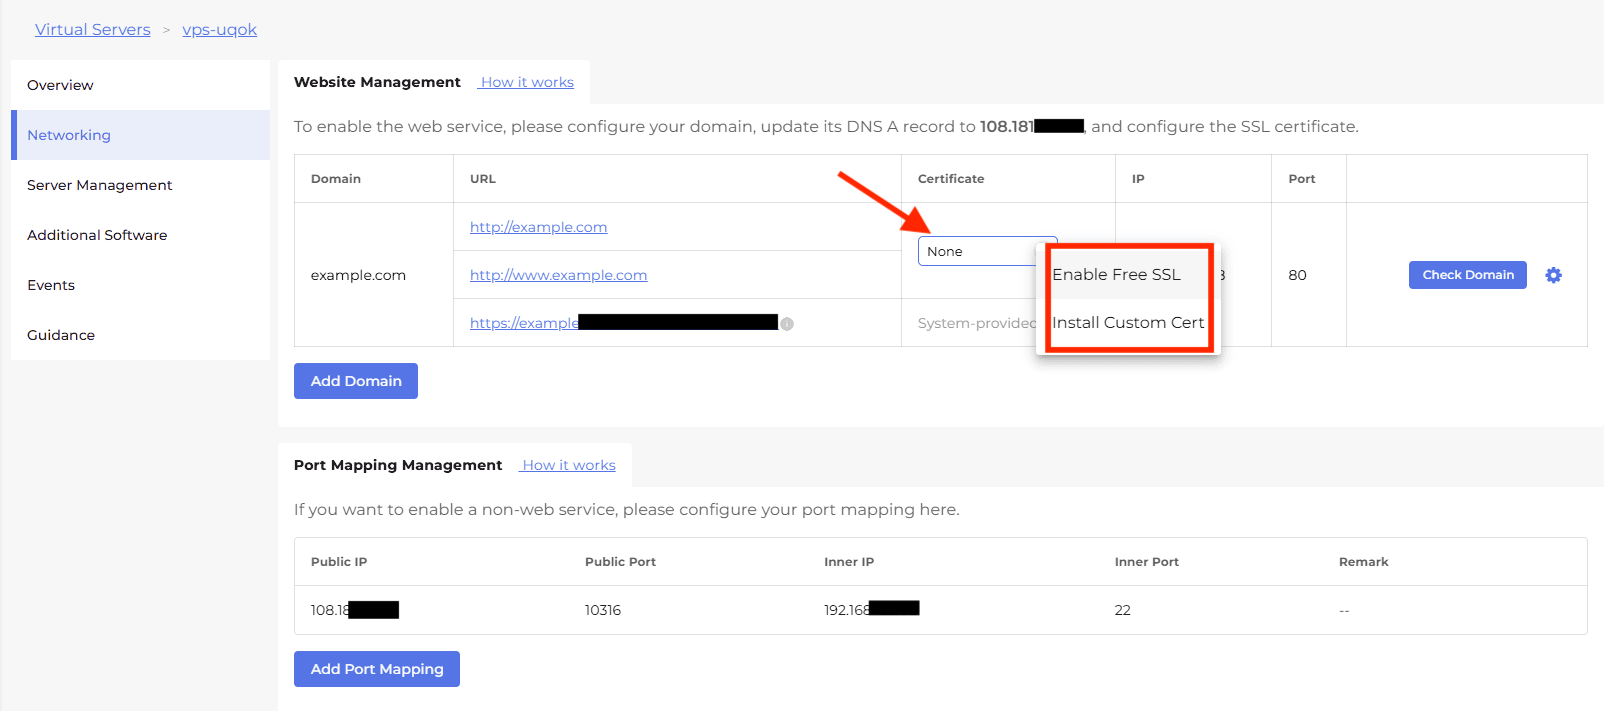
Once the SSL certificate is installed, visitors will be able to access your website securely using HTTPS
Scenario 2: Multiple Websites on Different Ports
Example configuration:
- VPS IP: 192.168.x.x
- Ports: 80, 81
- Domains: site1.com, site2.com
Control panel mappings:
- site1.com → 192.168.x.x:80
- site2.com → 192.168.x.x:81
To configure this scenario:
- Add two domain mappings in the control panel
- Follow the same steps described in Scenario 1
In this case, there is no need to configure domain binding or SSL certificates inside the VPS.
Scenario 3: Multiple Websites Sharing the Same Port
Example configuration:
- VPS IP: 192.168.x.x
- Port: 80
- Domains: site1.com, site2.com
Control panel mappings:
- site1.com → 192.168.x.x:80
- site2.com → 192.168.x.x:80
In this scenario:
- You must configure virtual hosts inside the VPS
- Each virtual host must use a server name that matches the domain added in the control panel
If you enabled a temporary domain in the control panel, the temporary domain must also be added to the corresponding virtual host configuration.
Nginx Configuration Example
Site1 has a temporary domain enabled.
server {
    listen 80;
    server_name site1.com temp1.dbm.shared-servers.com;

    root /var/www/site1;
    index index.html;

    access_log /var/log/nginx/site1.access.log;
    error_log /var/log/nginx/site1.error.log;
}

server {
    listen 80;
    server_name site2.com;

    root /var/www/site2;
    index index.html;

    access_log /var/log/nginx/site2.access.log;
    error_log /var/log/nginx/site2.error.log;
}
Apache Configuration Example
Site1.conf (temporary domain enabled)
<VirtualHost *:80>
    ServerName site1.com
    ServerAlias temp2.dbm.shared-servers.com

    DocumentRoot /var/www/site1

    <Directory /var/www/site1>
        AllowOverride All
        Require all granted
    </Directory>

    ErrorLog logs/site1_error.log
    CustomLog logs/site1_access.log combined
</VirtualHost>
Site2.conf
<VirtualHost *:80>
    ServerName site2.com

    DocumentRoot /var/www/site2

    <Directory /var/www/site2>
        AllowOverride All
        Require all granted
    </Directory>

    ErrorLog logs/site2_error.log
    CustomLog logs/site2_access.log combined
</VirtualHost>
Conclusion
By configuring domain mapping in the control panel, you can easily publish web services running inside your Shared IP Linux VPS. Whether you host a single website, multiple sites on different ports, or multiple domains sharing the same port, the platform routing system will forward requests from the public domain to your VPS service.
If you encounter any issues during setup or need further assistance, please contact our support team, and we will be happy to help.